 Postling
Guide
Postling, step by step
Setup takes about ten minutes: twelve short steps, each with sensible choices already filled in. After that Postling works on its own, and you check in when a briefing arrives. This guide walks through every step and every screen.
The screenshots show a made-up family, the Morgans: Alex, their children Emma and Leo at Hillside Primary, and a job search. Your screens show your own email, which never leaves your Mac.
Setting up
Step 1 of 12
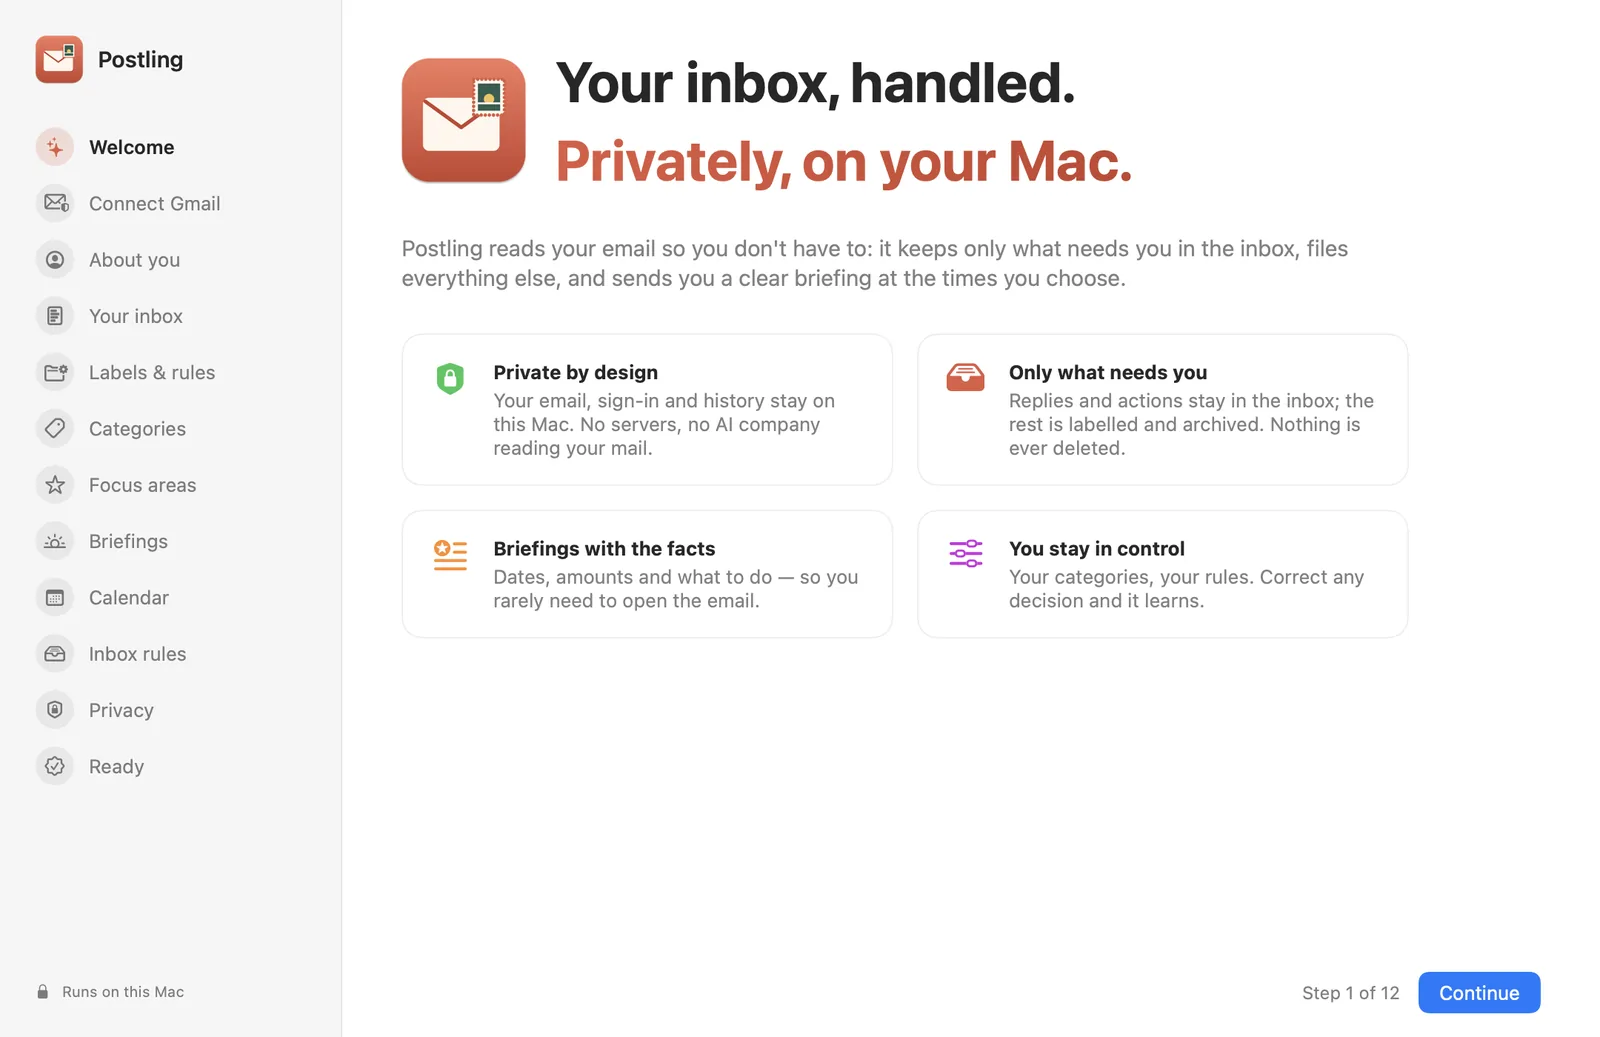
Welcome
Open Postling and the setup window appears, with the twelve steps listed on the left. You can go back to any finished step by clicking it, and nothing changes in Gmail until you press Start Postling at the end.
Step 2 of 12
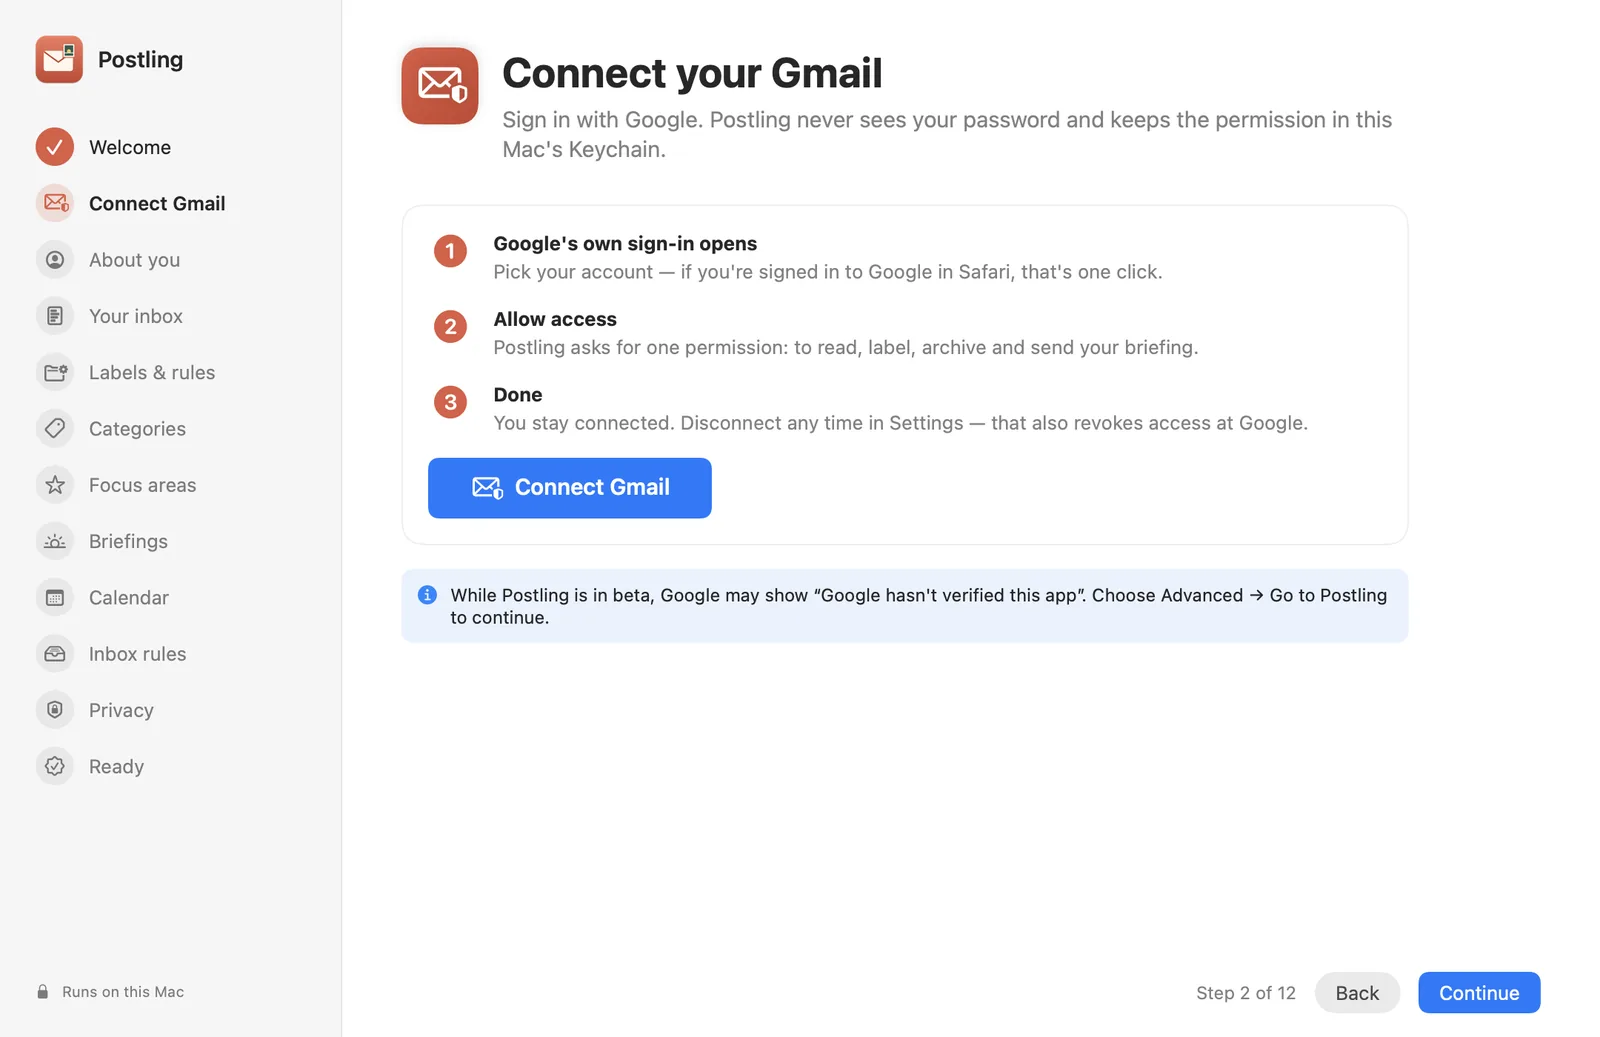
Connect Gmail
Click Connect Gmail. Google's own sign-in opens, so Postling never sees your password. Pick your account and allow access.
- Postling asks for one permission: to read, label and archive your email, and to send your briefing from your account. It never deletes anything.
- The permission is kept in your Mac's Keychain. Disconnecting in Settings also revokes it at Google.
- While Postling is in beta, Google may say it "hasn't verified this app". Choose Advanced → Go to Postling to continue.
Step 3 of 12
About you
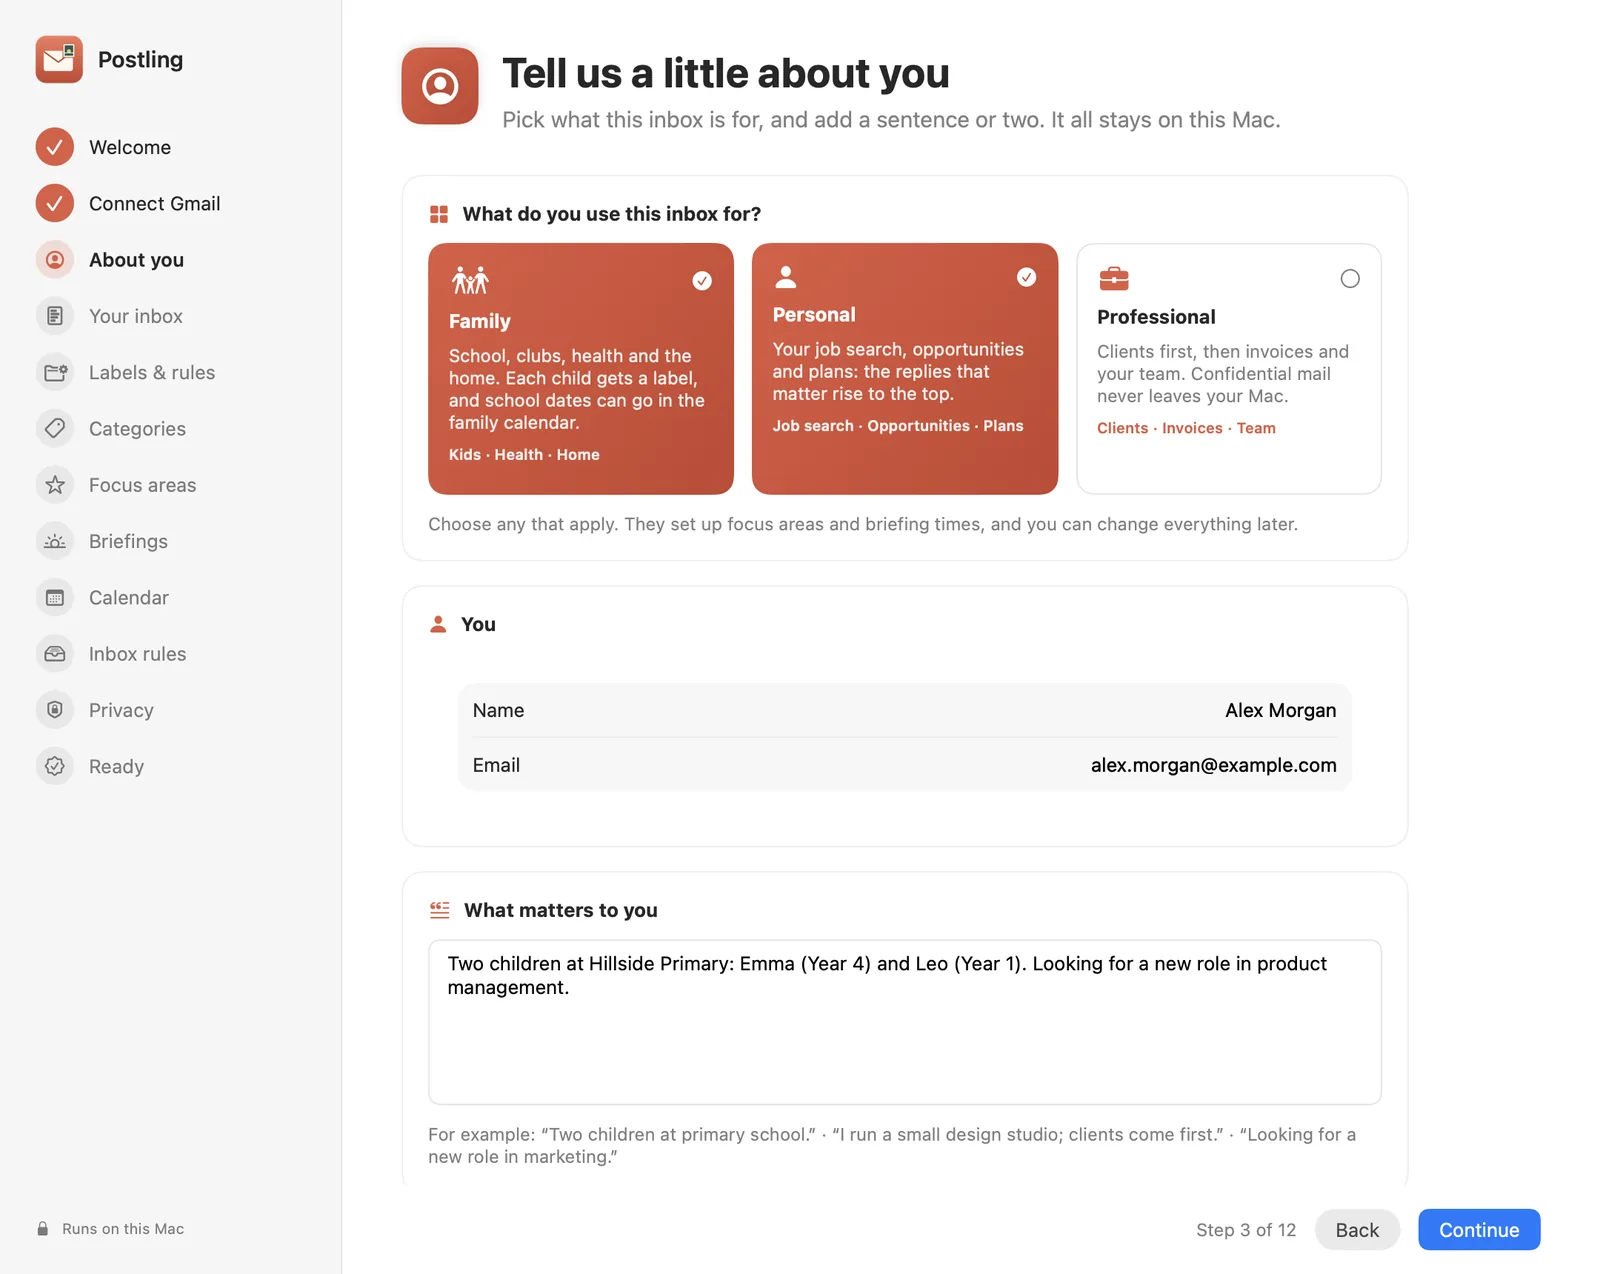
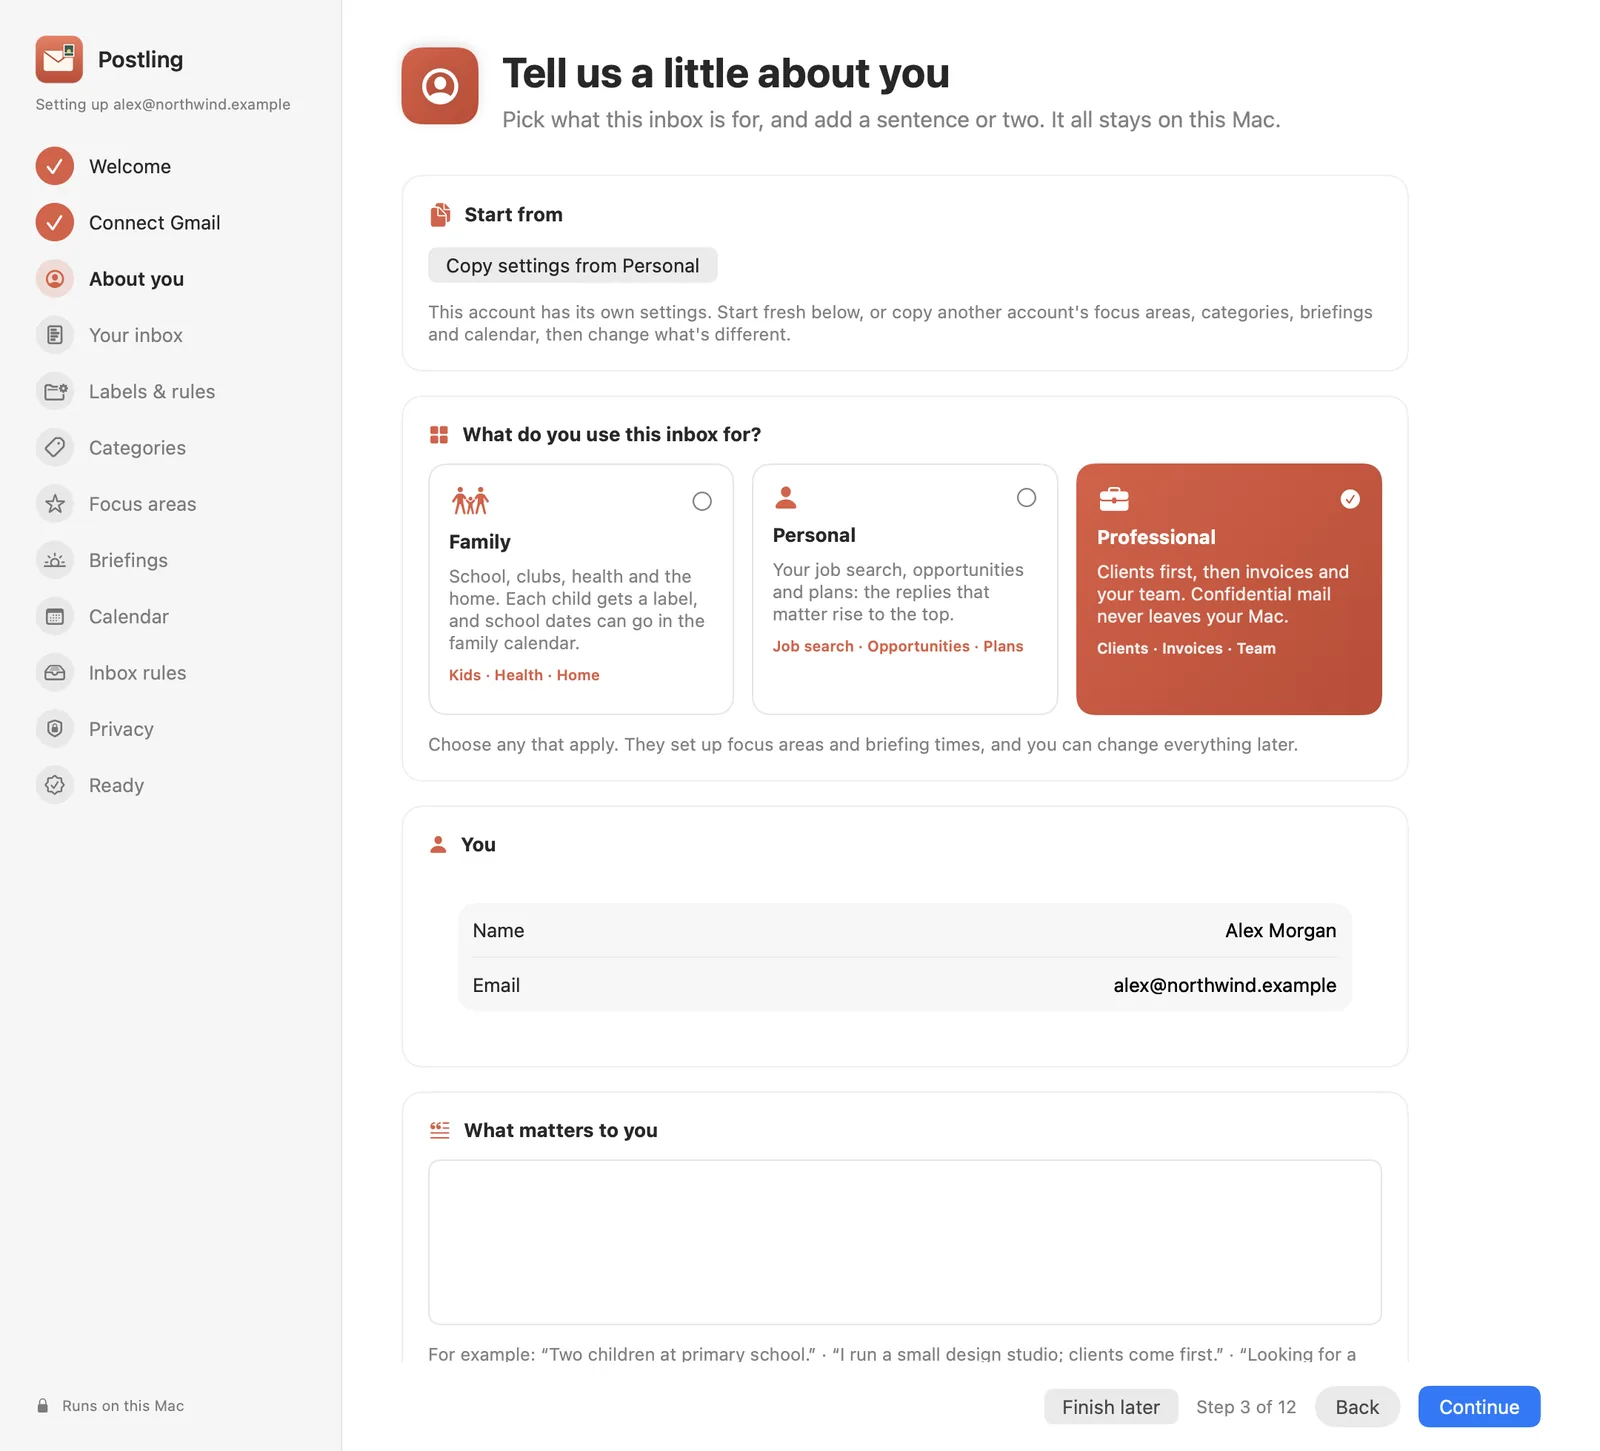
Choose what this inbox is for. You can pick more than one, and each choice sets up focus areas and briefing times you can change later:
- Family: Kids, Health and Home. Each child gets their own label, and school dates can go in the family calendar.
- Personal: Job search, Opportunities and Plans.
- Professional: Clients, Invoices and Team.
Then add your name and a sentence or two about what matters to you, such as "Two children at Hillside Primary" or "I run a small design studio; clients come first". The AI on your Mac uses this to judge what needs you.
Step 4 of 12
Your inbox
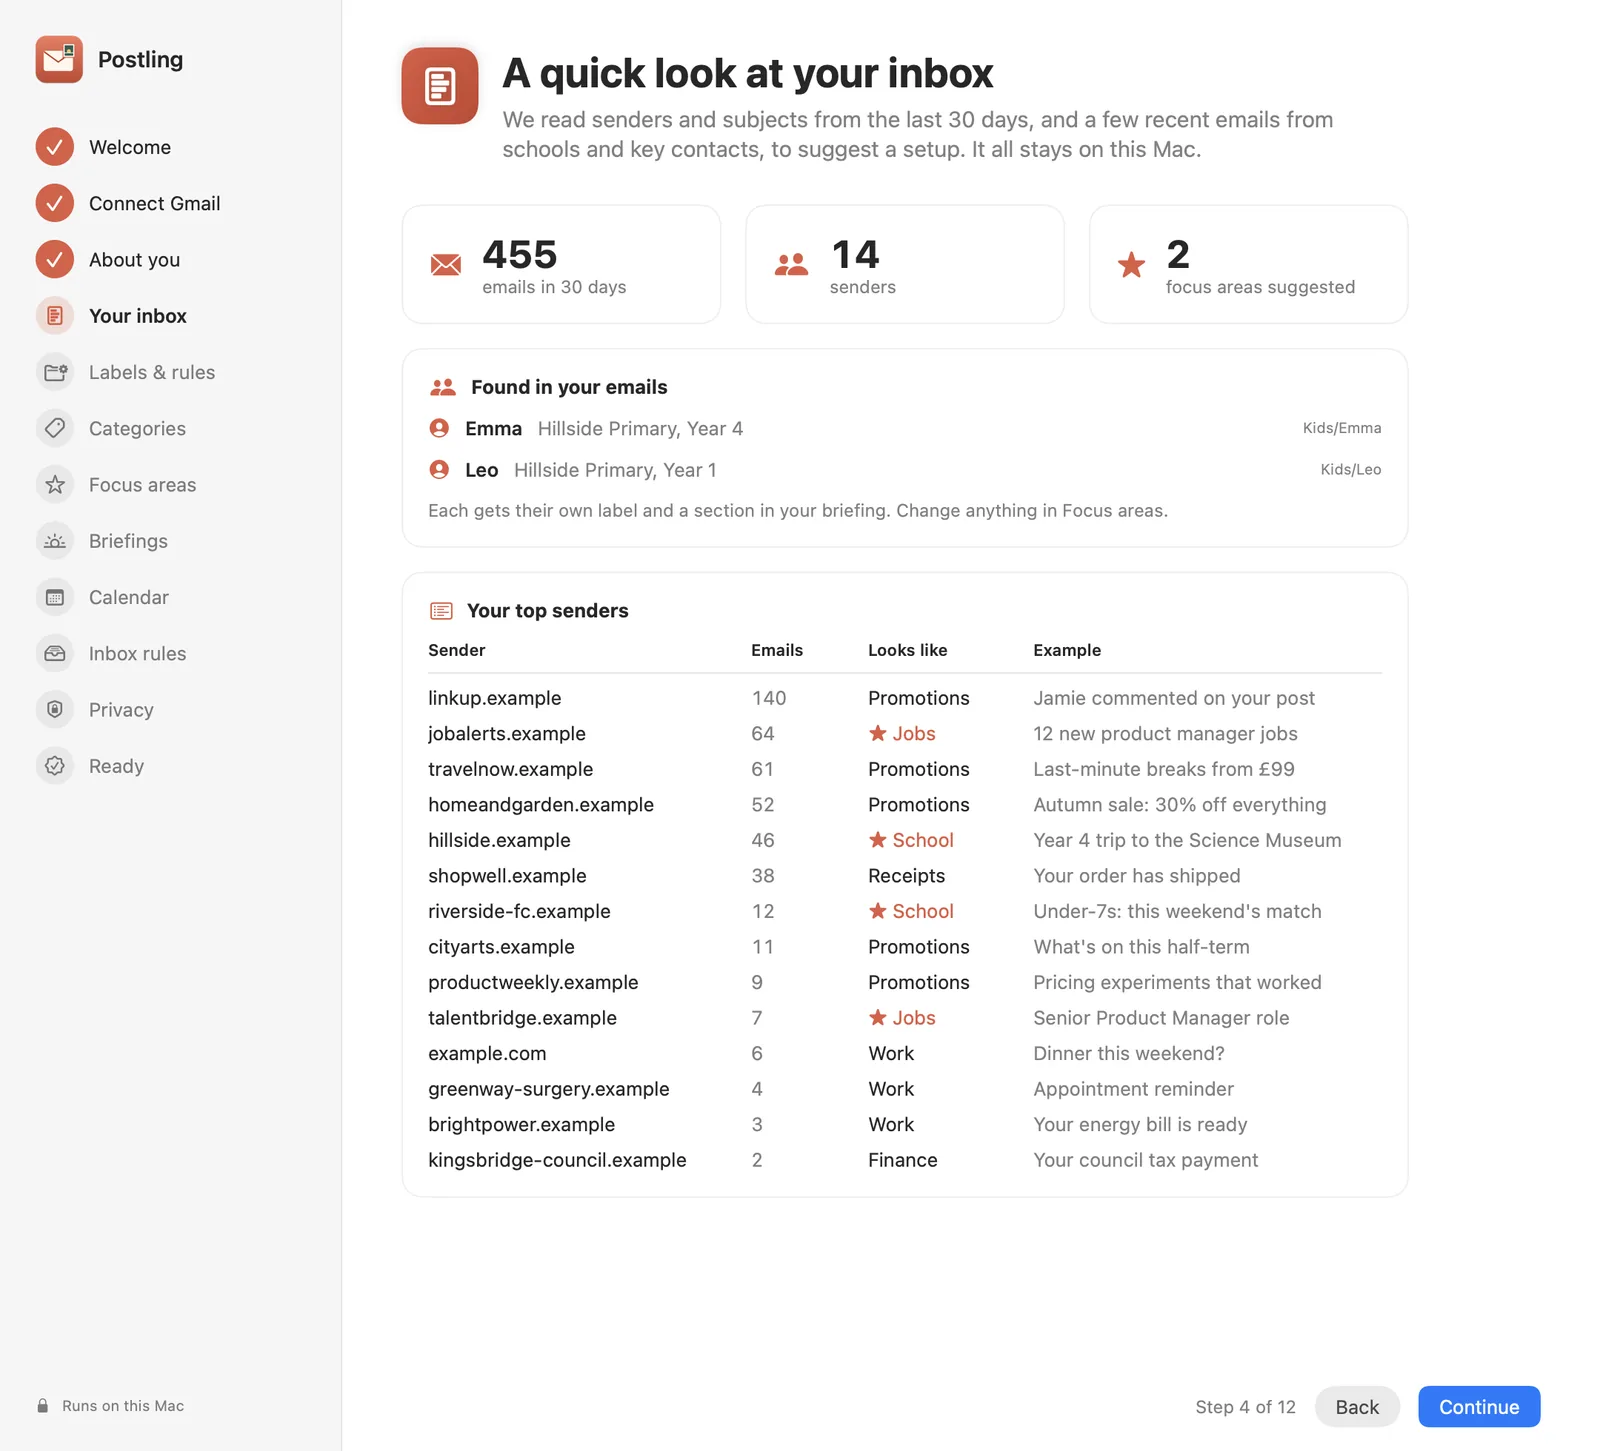
Postling takes a quick look at your inbox to suggest a setup. It reads senders and subjects from the last 30 days, plus a few recent emails from schools and key contacts. This happens on your Mac and takes a minute or two.
- Found in your emails lists the people it found, such as each child with their school and year. Each gets their own label, like Kids/Emma, and their own section in your briefing.
- Your top senders shows who writes most and what their mail looks like. Senders marked ★ belong to a focus area.
Step 5 of 12
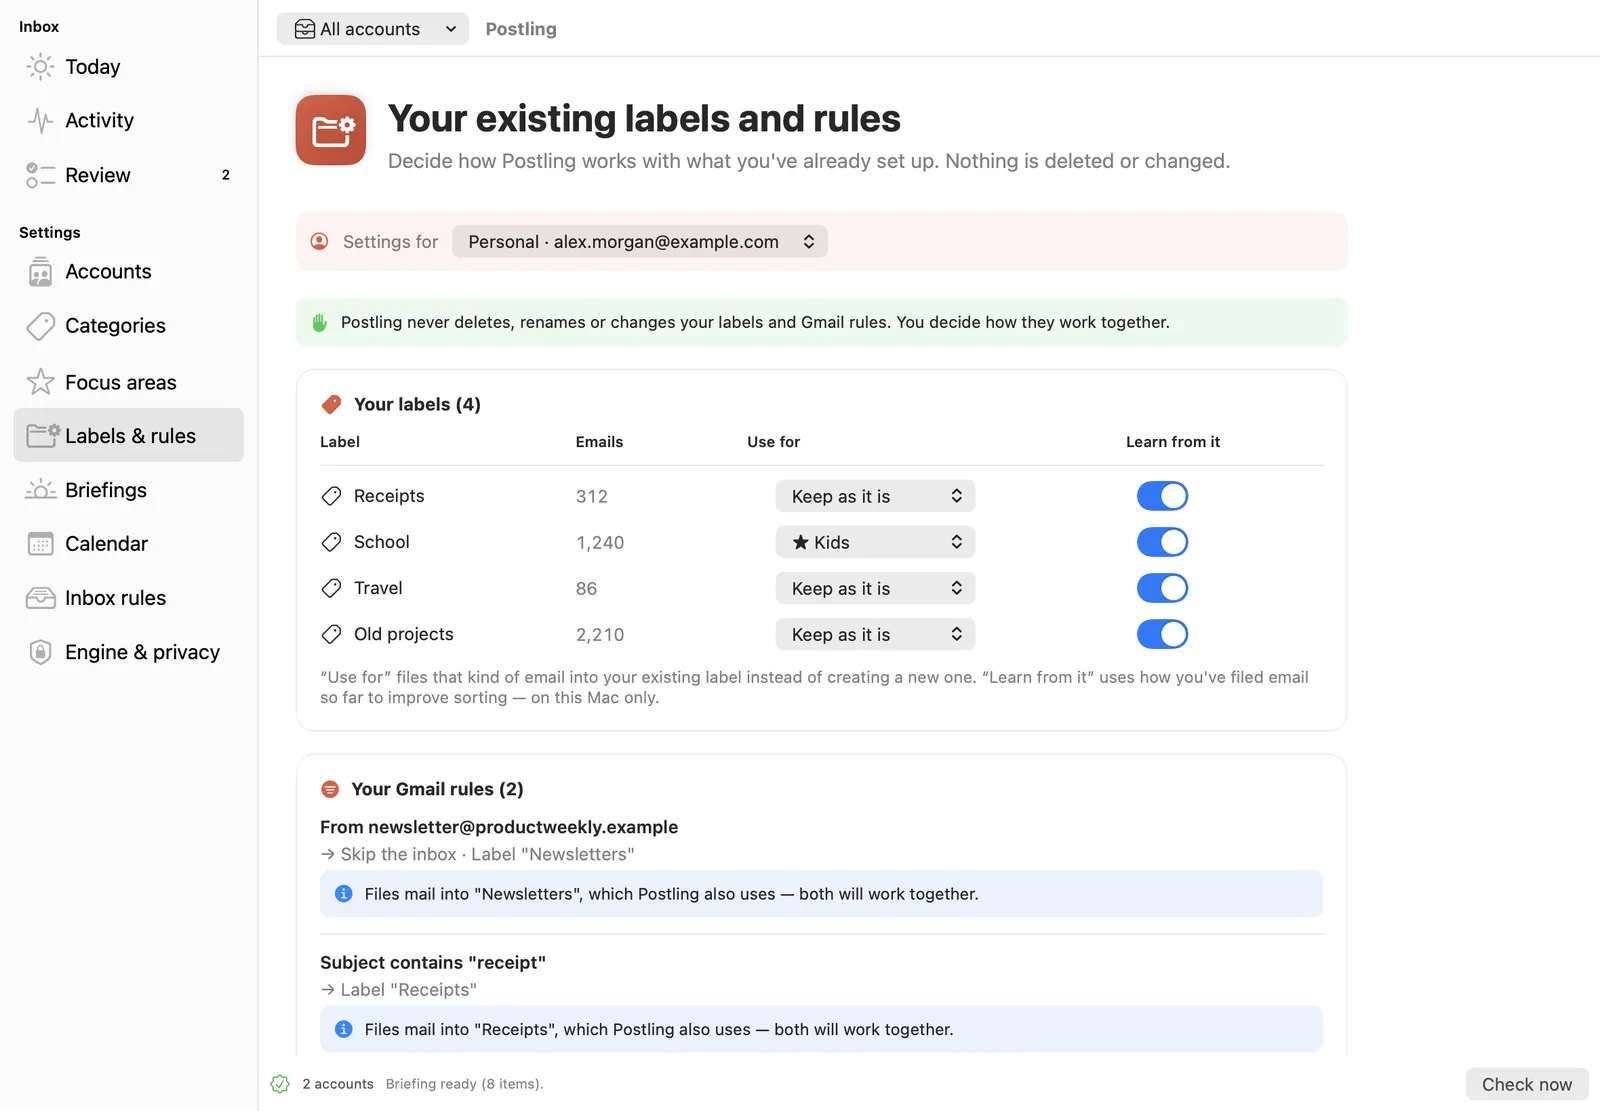
Your existing labels and rules
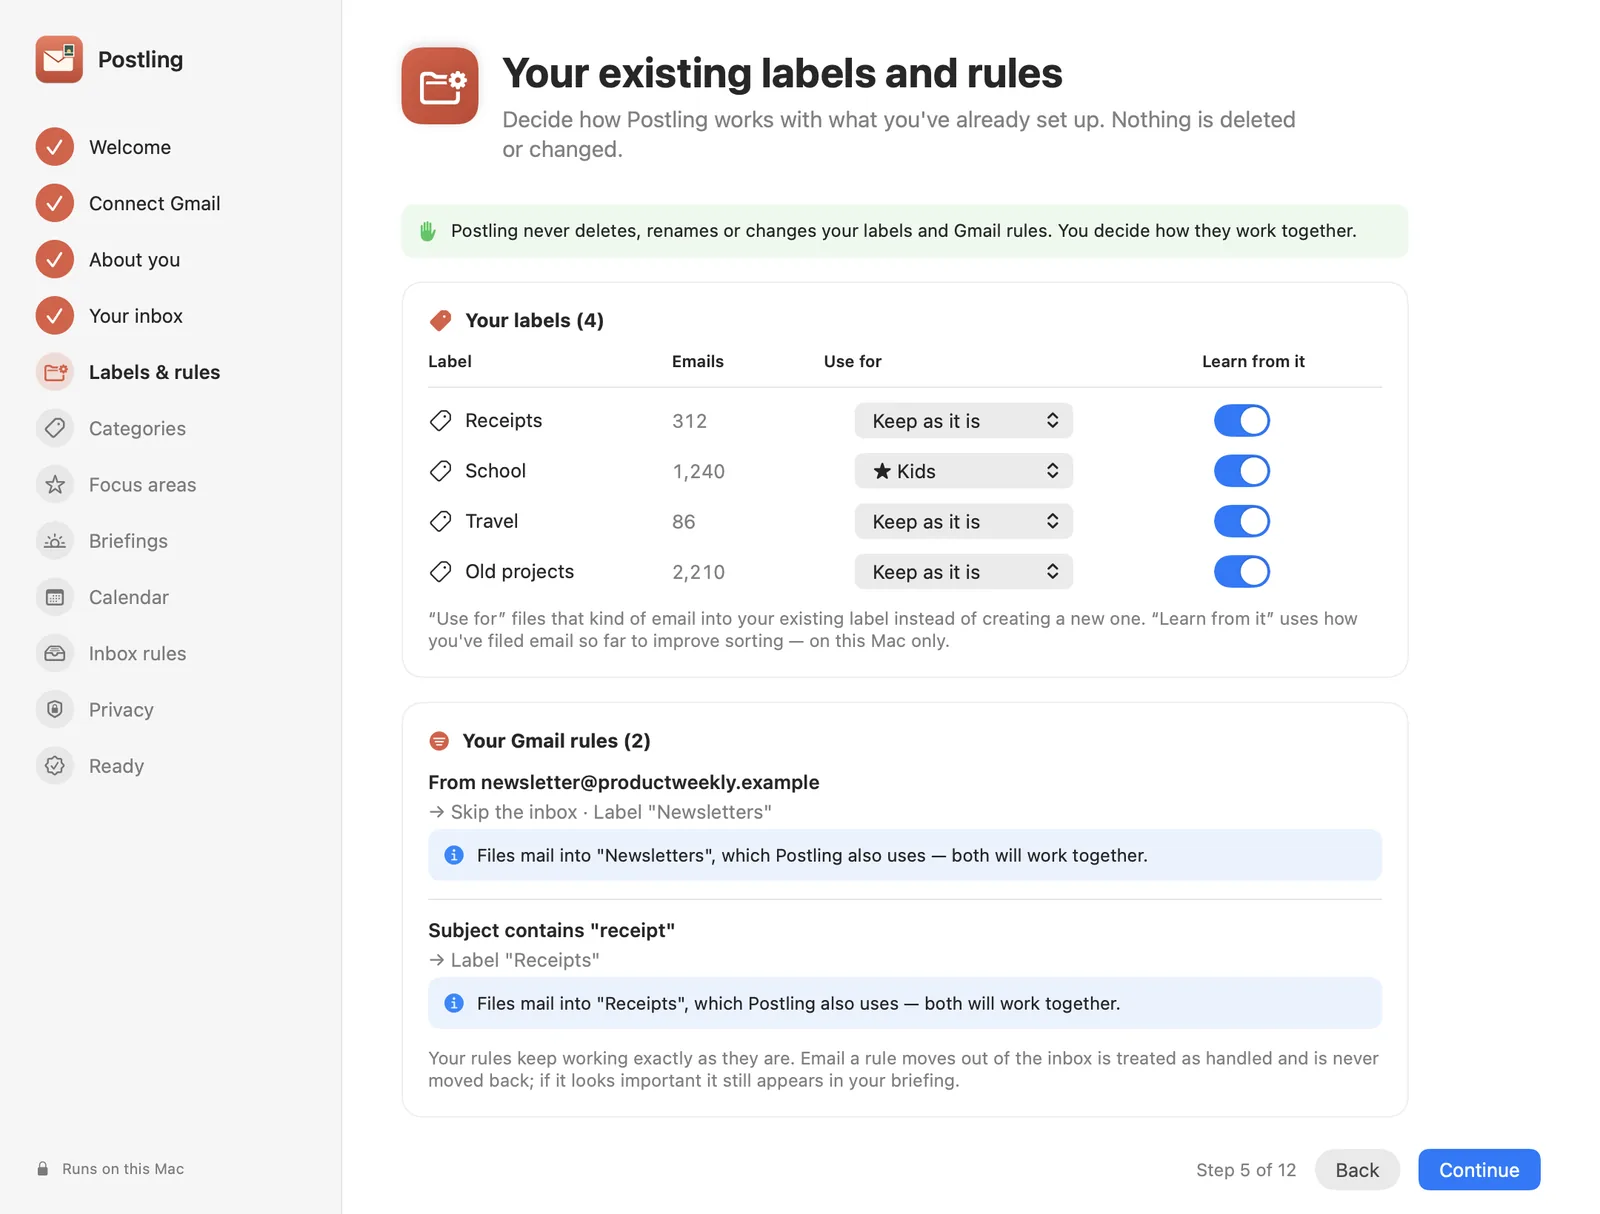
If you already use Gmail labels and filters, decide how Postling works with them. Nothing you've set up is deleted, renamed or changed.
- Use for: points one of Postling's categories or focus areas at your label, so no duplicate is created. In the example, the existing School label is used for Kids.
- Learn from it: what you've filed there before helps Postling sort new mail the same way, on your Mac only.
- Your Gmail filters keep working. Postling explains how each one fits in, such as a filter that already files newsletters.
Step 6 of 12
Categories
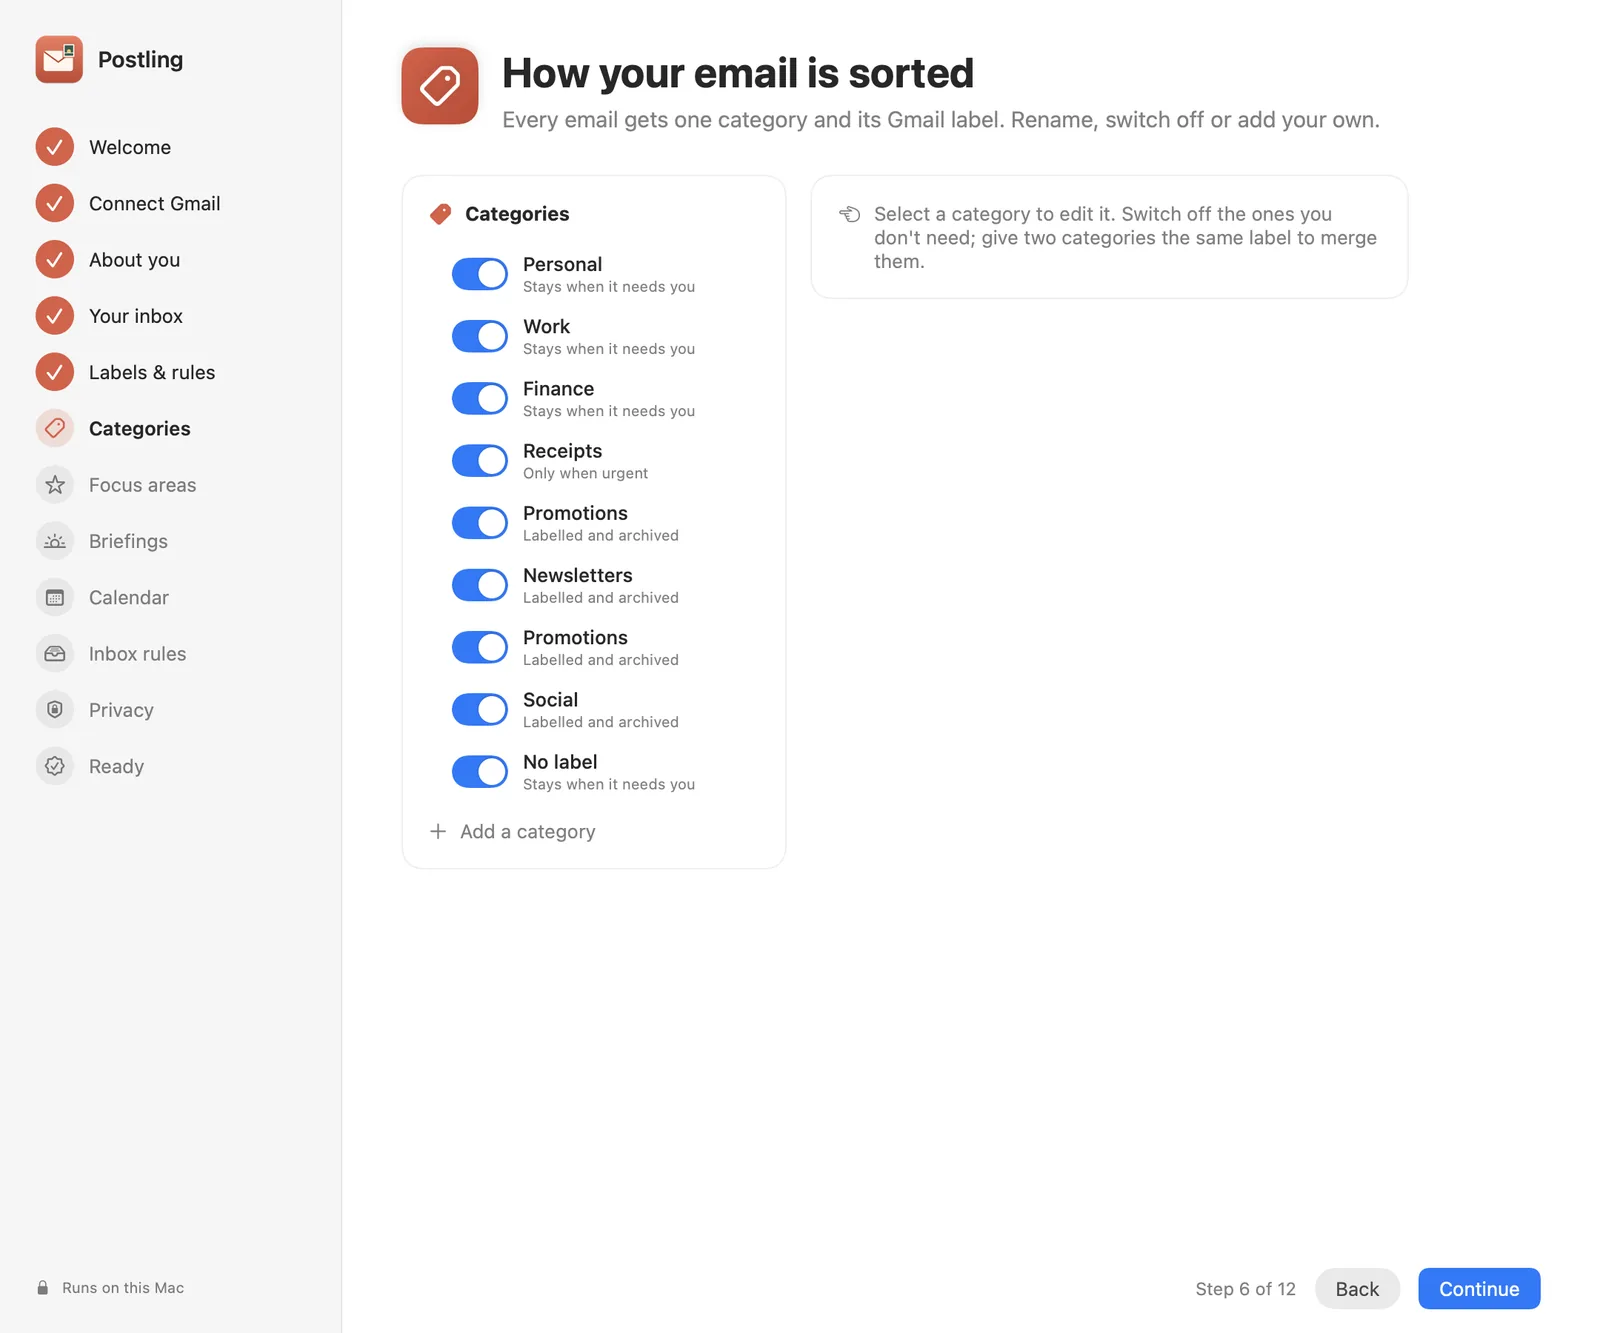
Every email gets one category and the matching Gmail label. Under each category you can see what happens to it: "stays when it needs you" for personal, work and finance mail, or "labelled and archived" for promotions, newsletters and social updates.
Click a category to rename it or change its label. Switch off the ones you don't need, or give two categories the same label to merge them.
Step 7 of 12
Focus areas
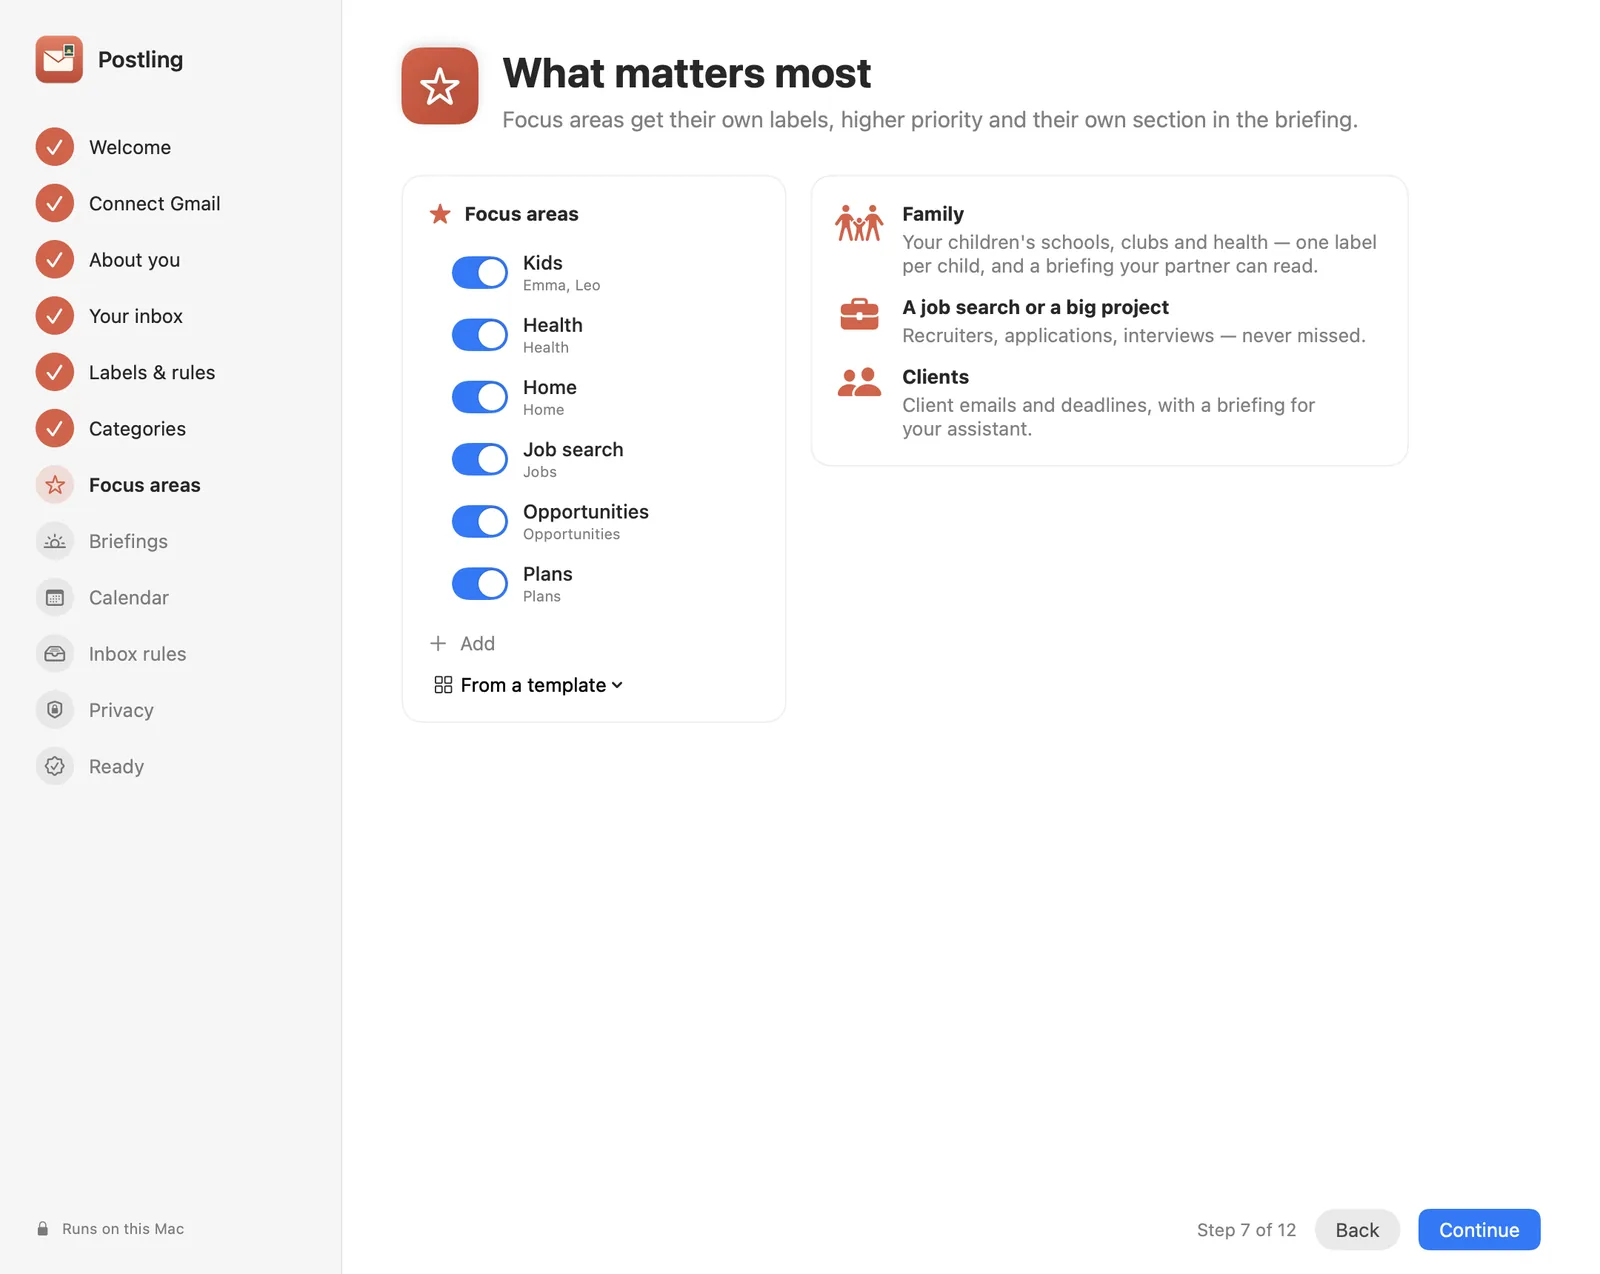
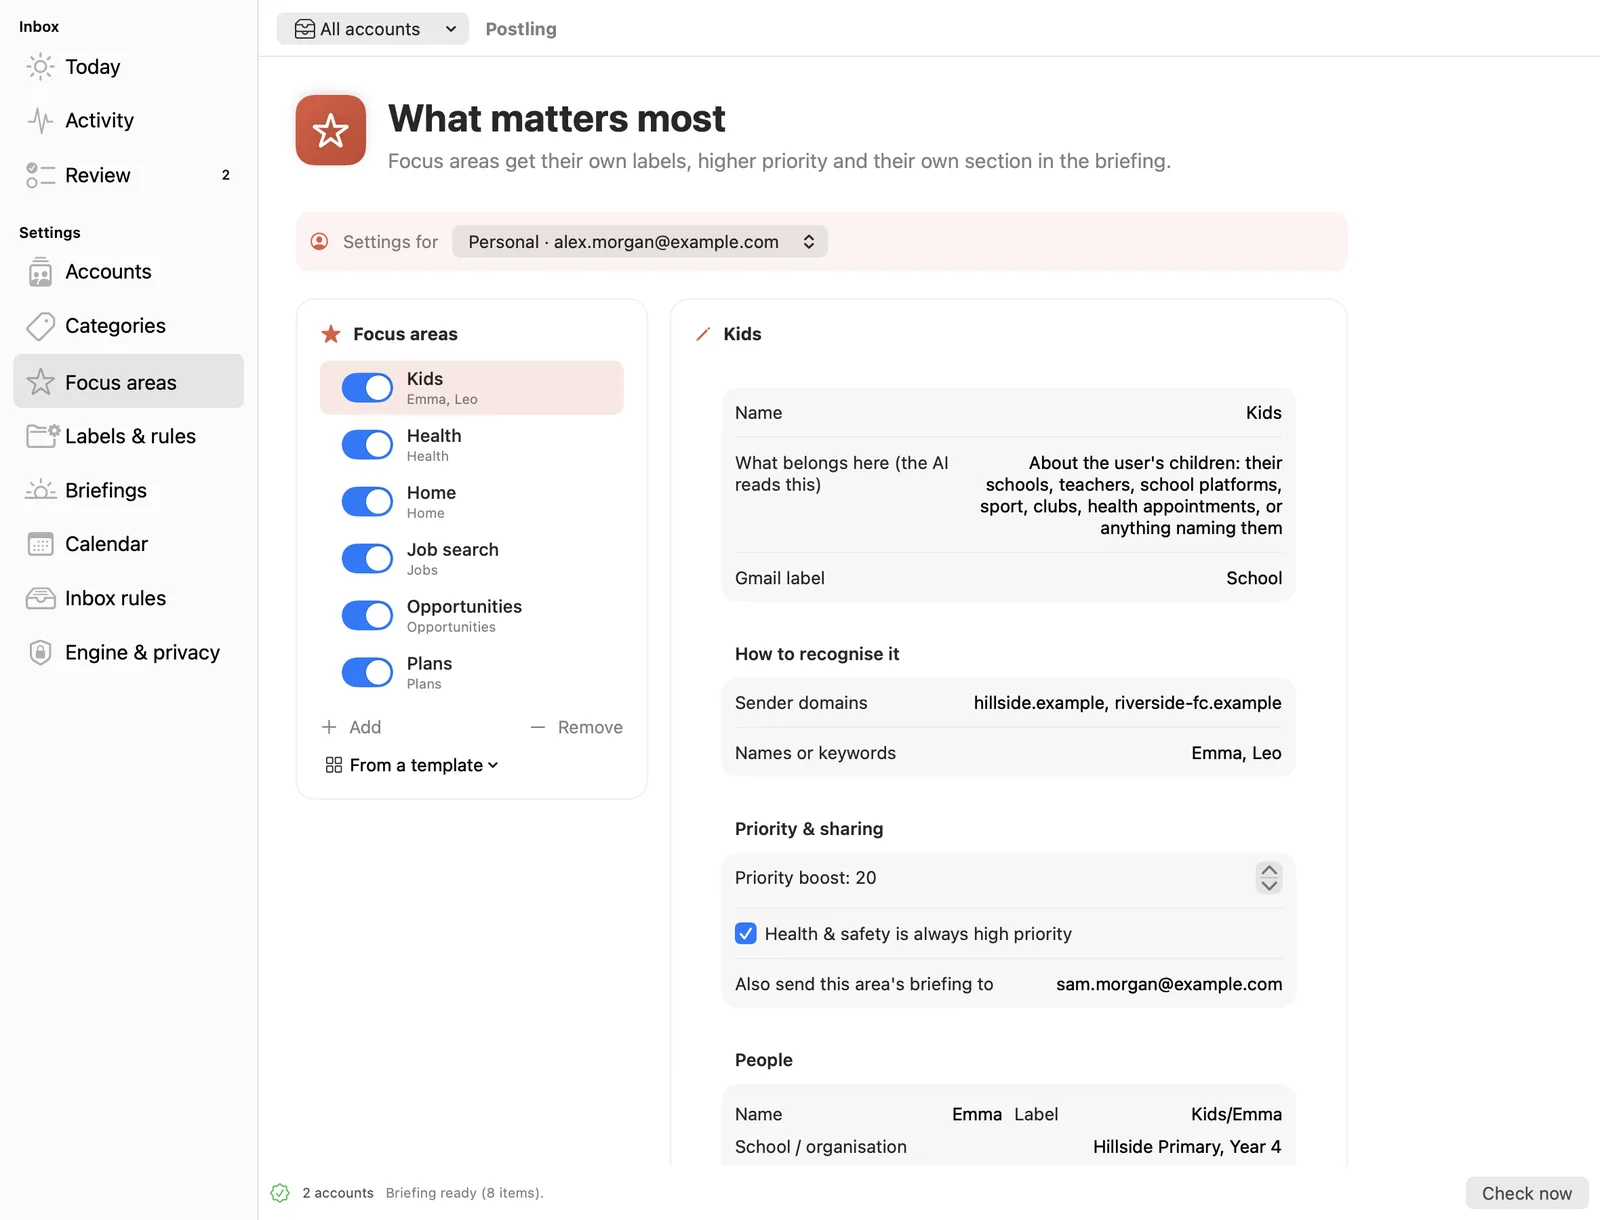
Focus areas are what matters most to you. They get their own labels, a higher priority and their own section at the top of your briefing. Your template and the inbox scan have already filled these in, so here you just check them.
Click an area to see how Postling recognises it, using sender domains and names. You can also make health and safety always high priority, or send that area's briefing to someone else, such as your partner for Kids. More on editing focus areas.
Step 8 of 12
Briefings
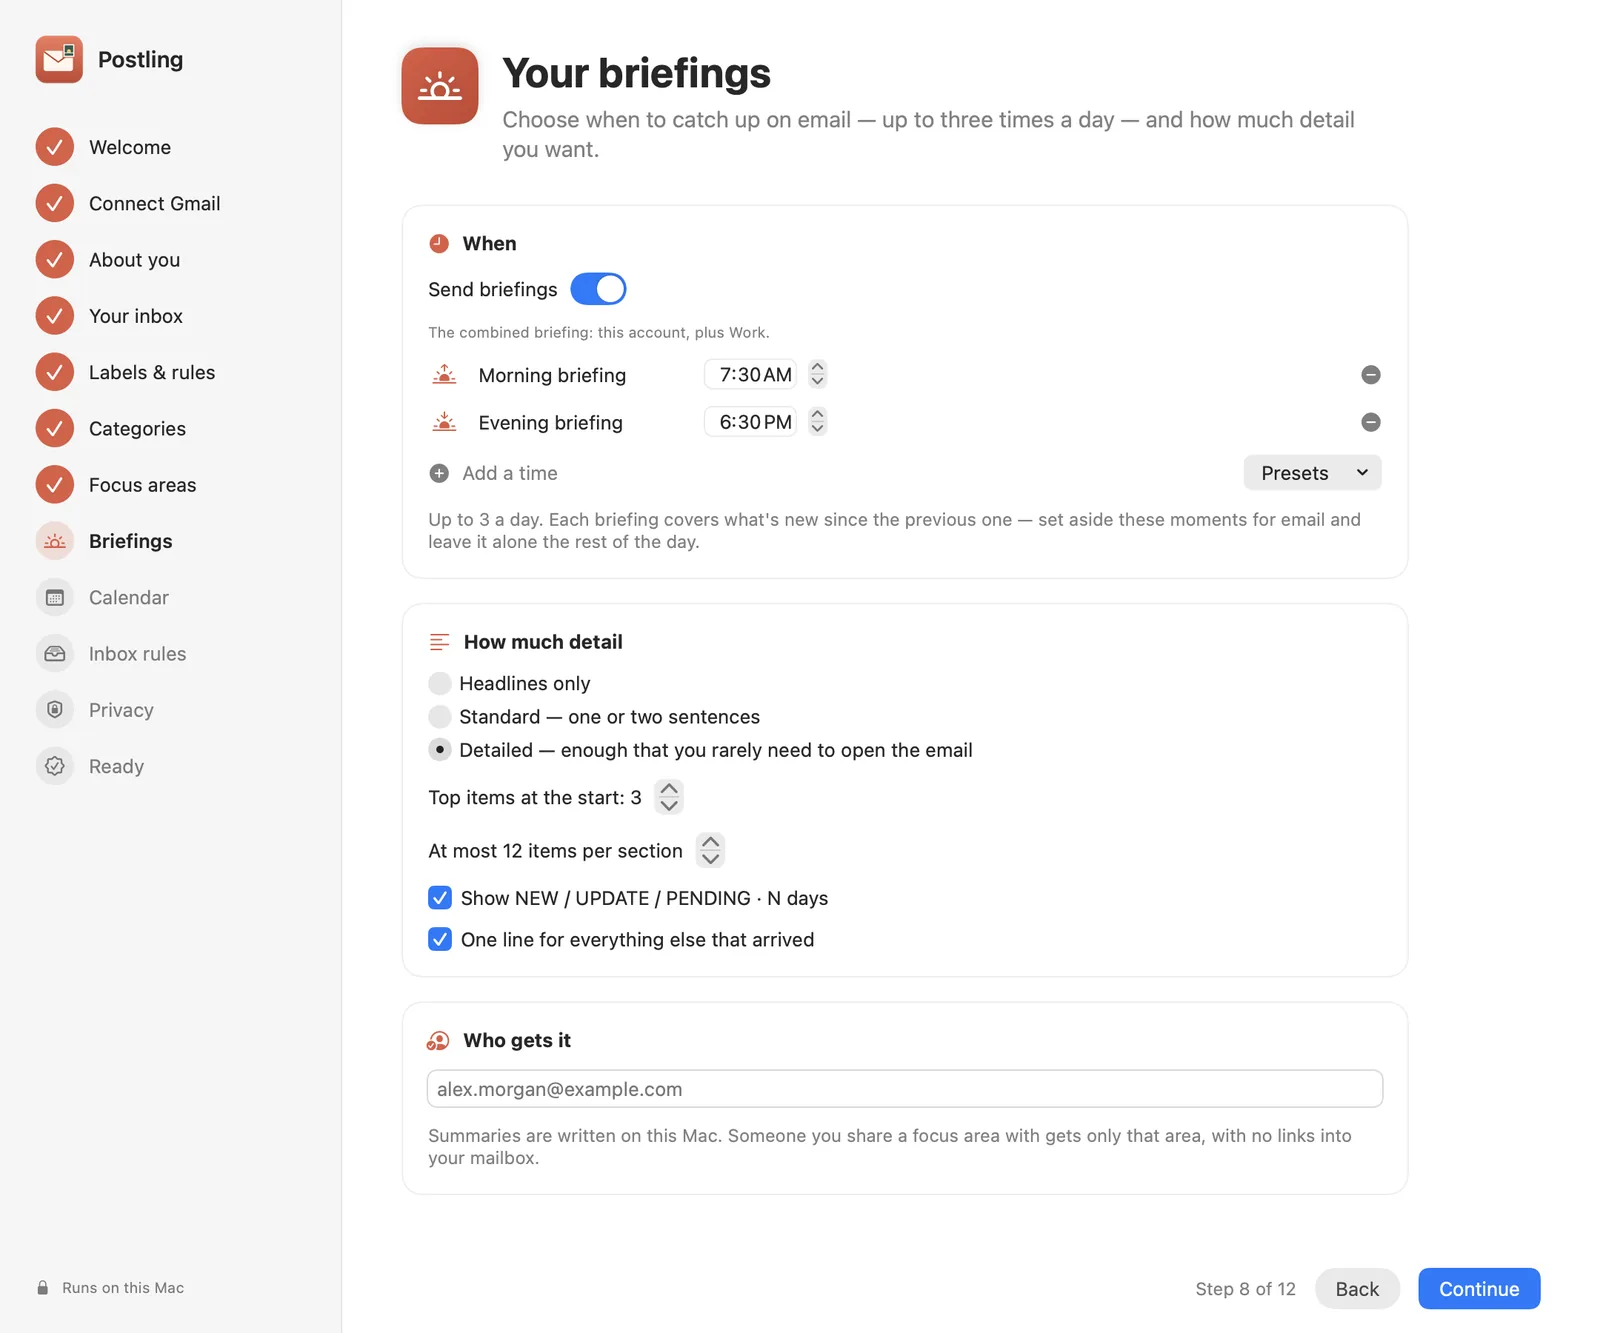
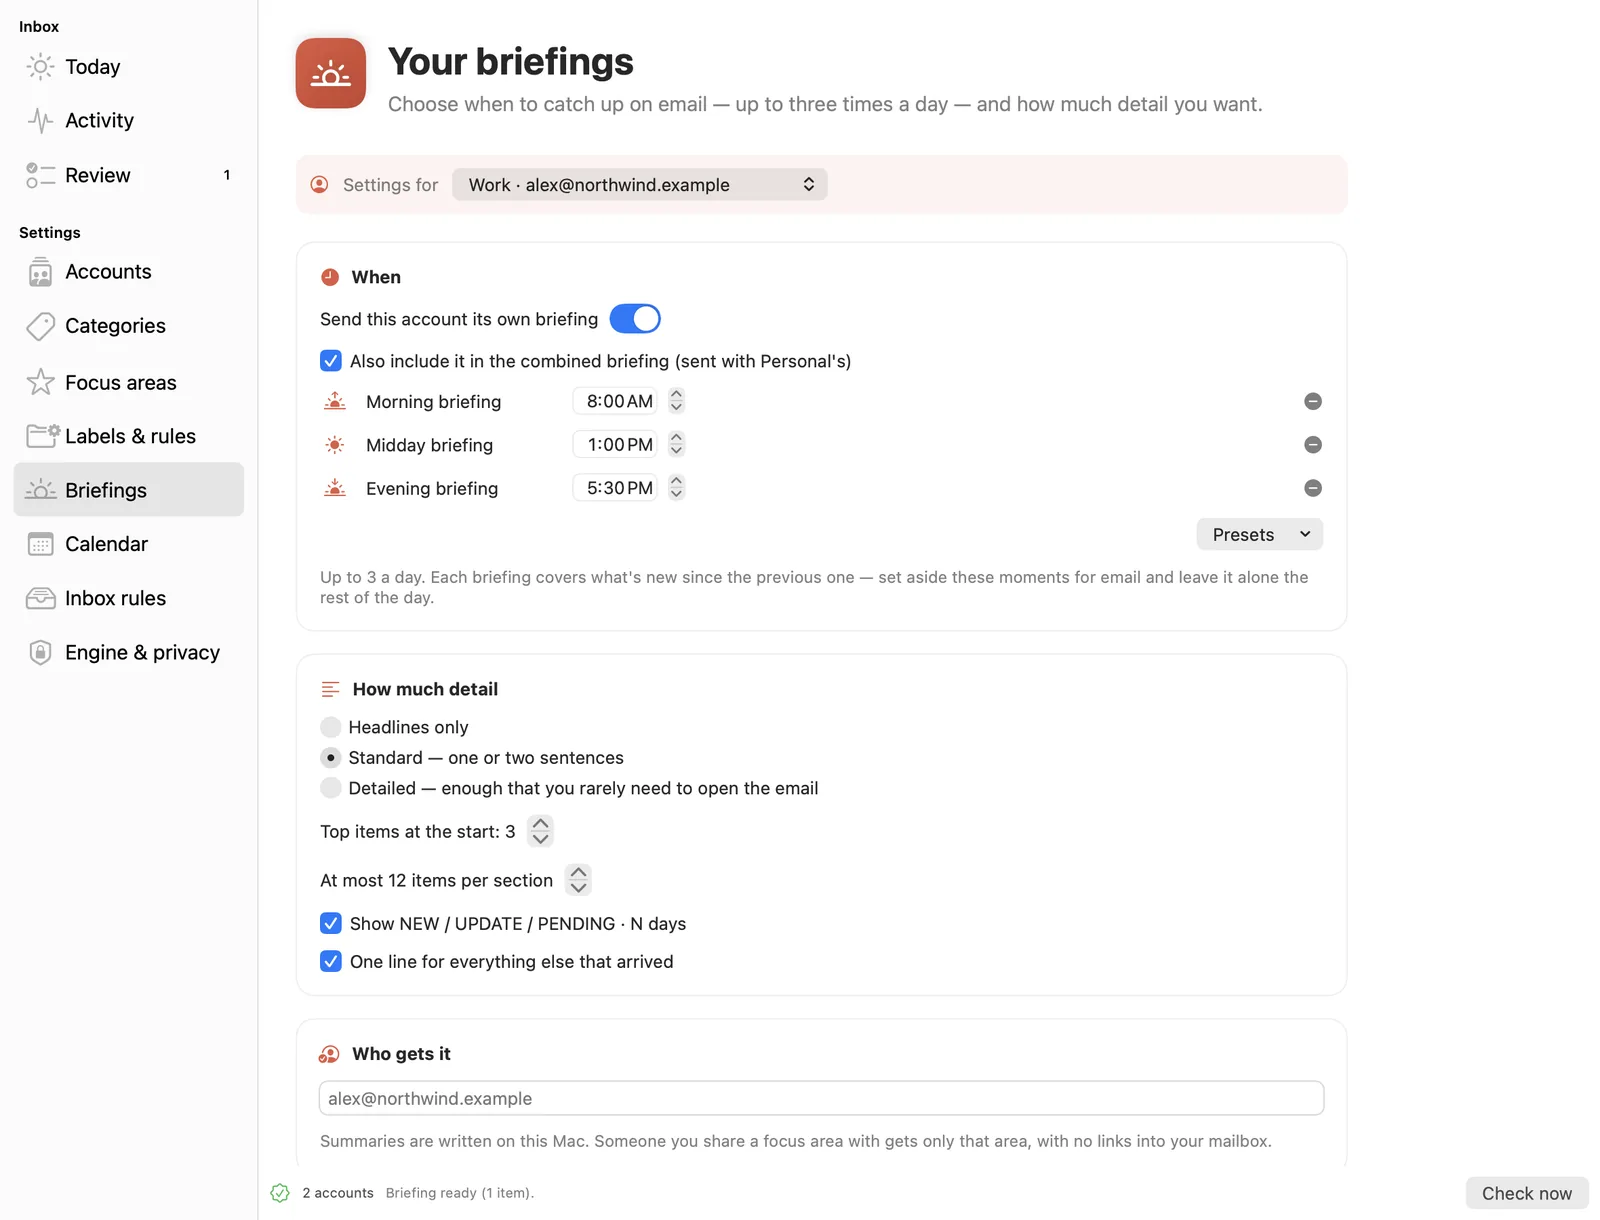
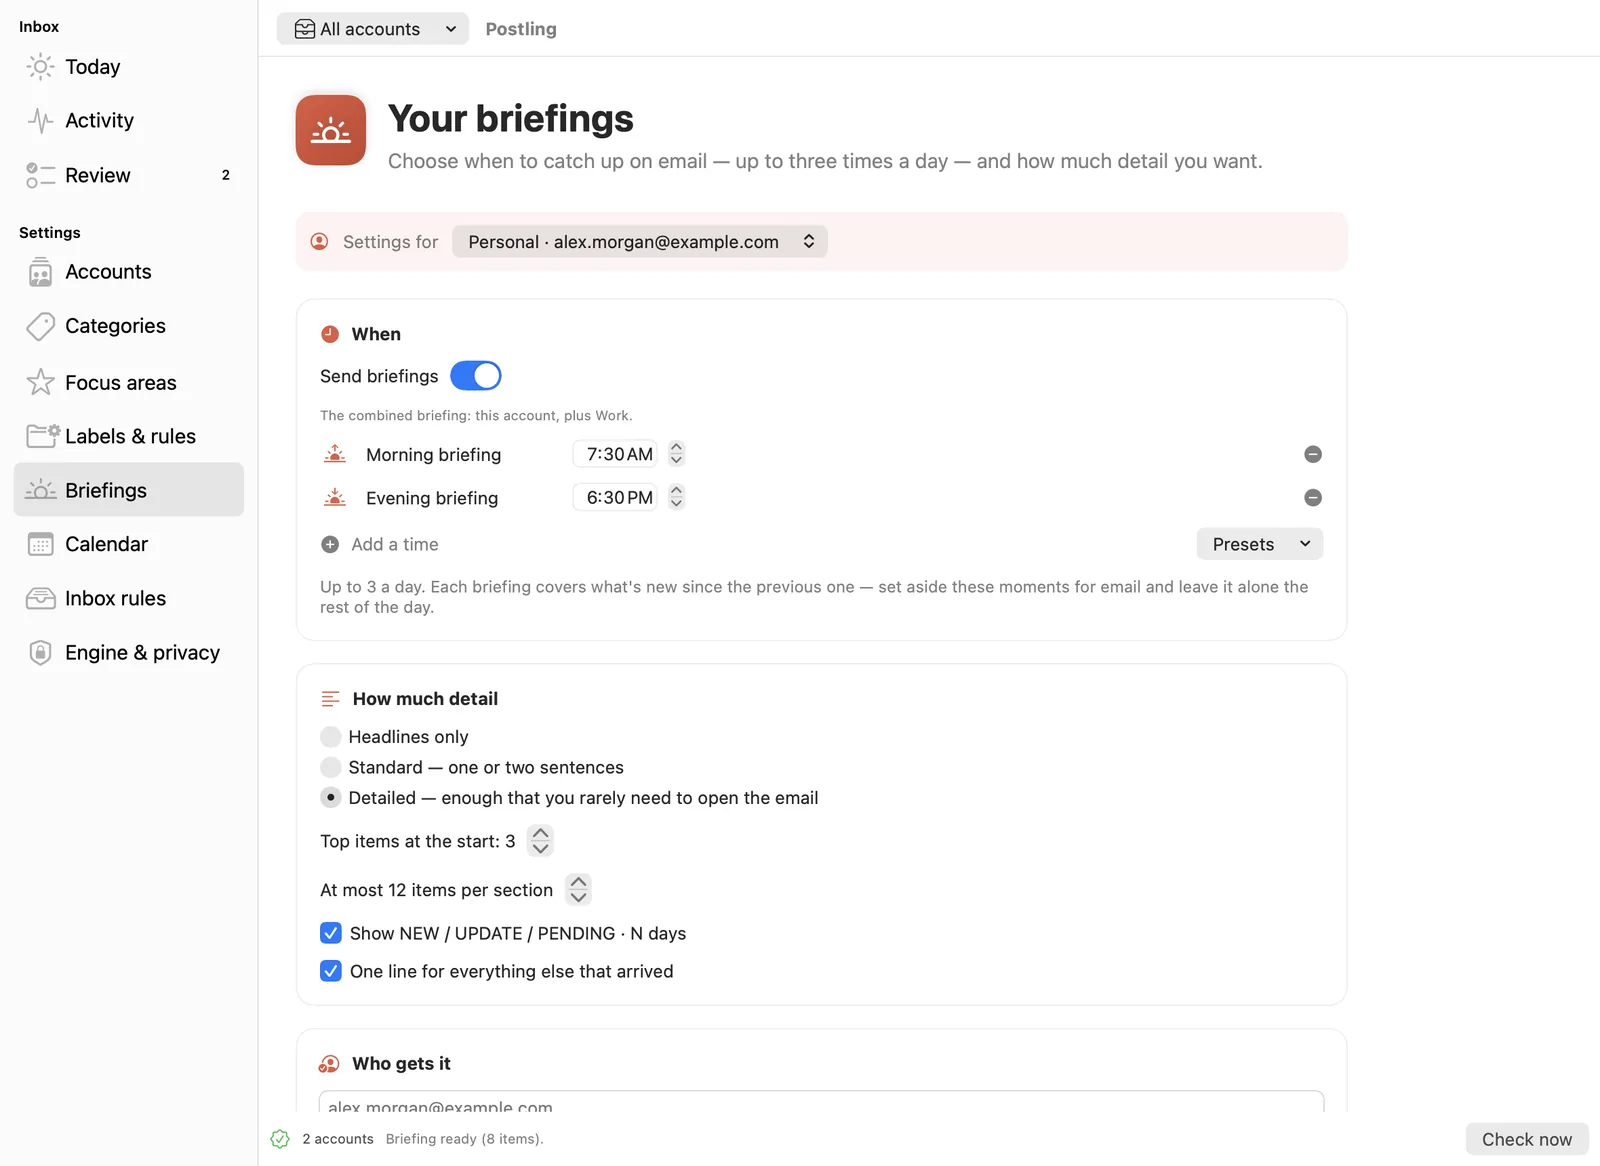
Choose when to catch up: up to three times a day. Each briefing covers what's new since the one before. Presets cover common routines, such as a morning and evening briefing for a family.
- How much detail: headlines only, one or two sentences, or detailed, which includes every date and amount so you rarely need to open the email.
- NEW / UPDATE / PENDING tags show at a glance what's arrived, what's changed and what's still waiting.
- Who gets it: your own address by default. Add others if you like.
Step 9 of 12
Calendar
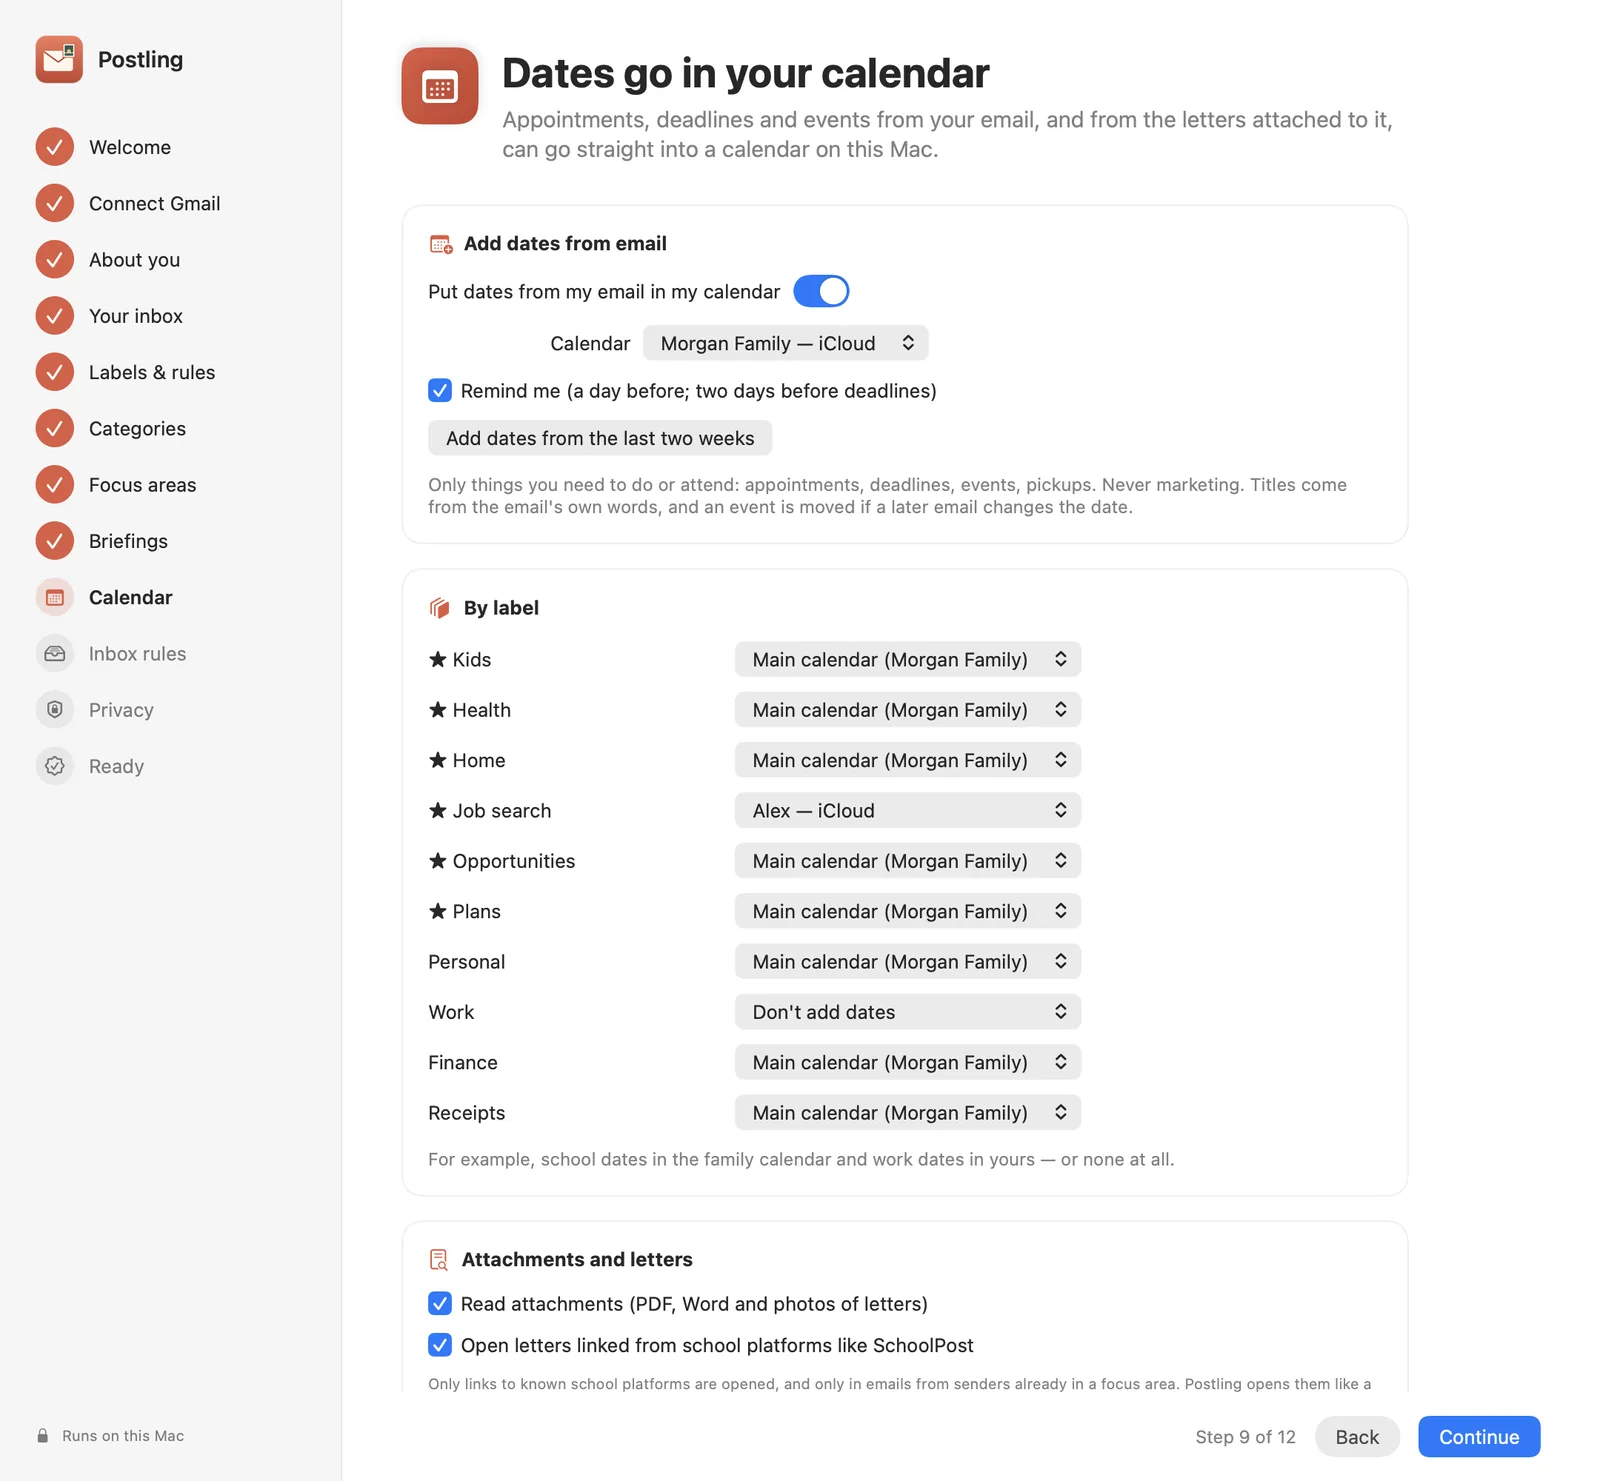
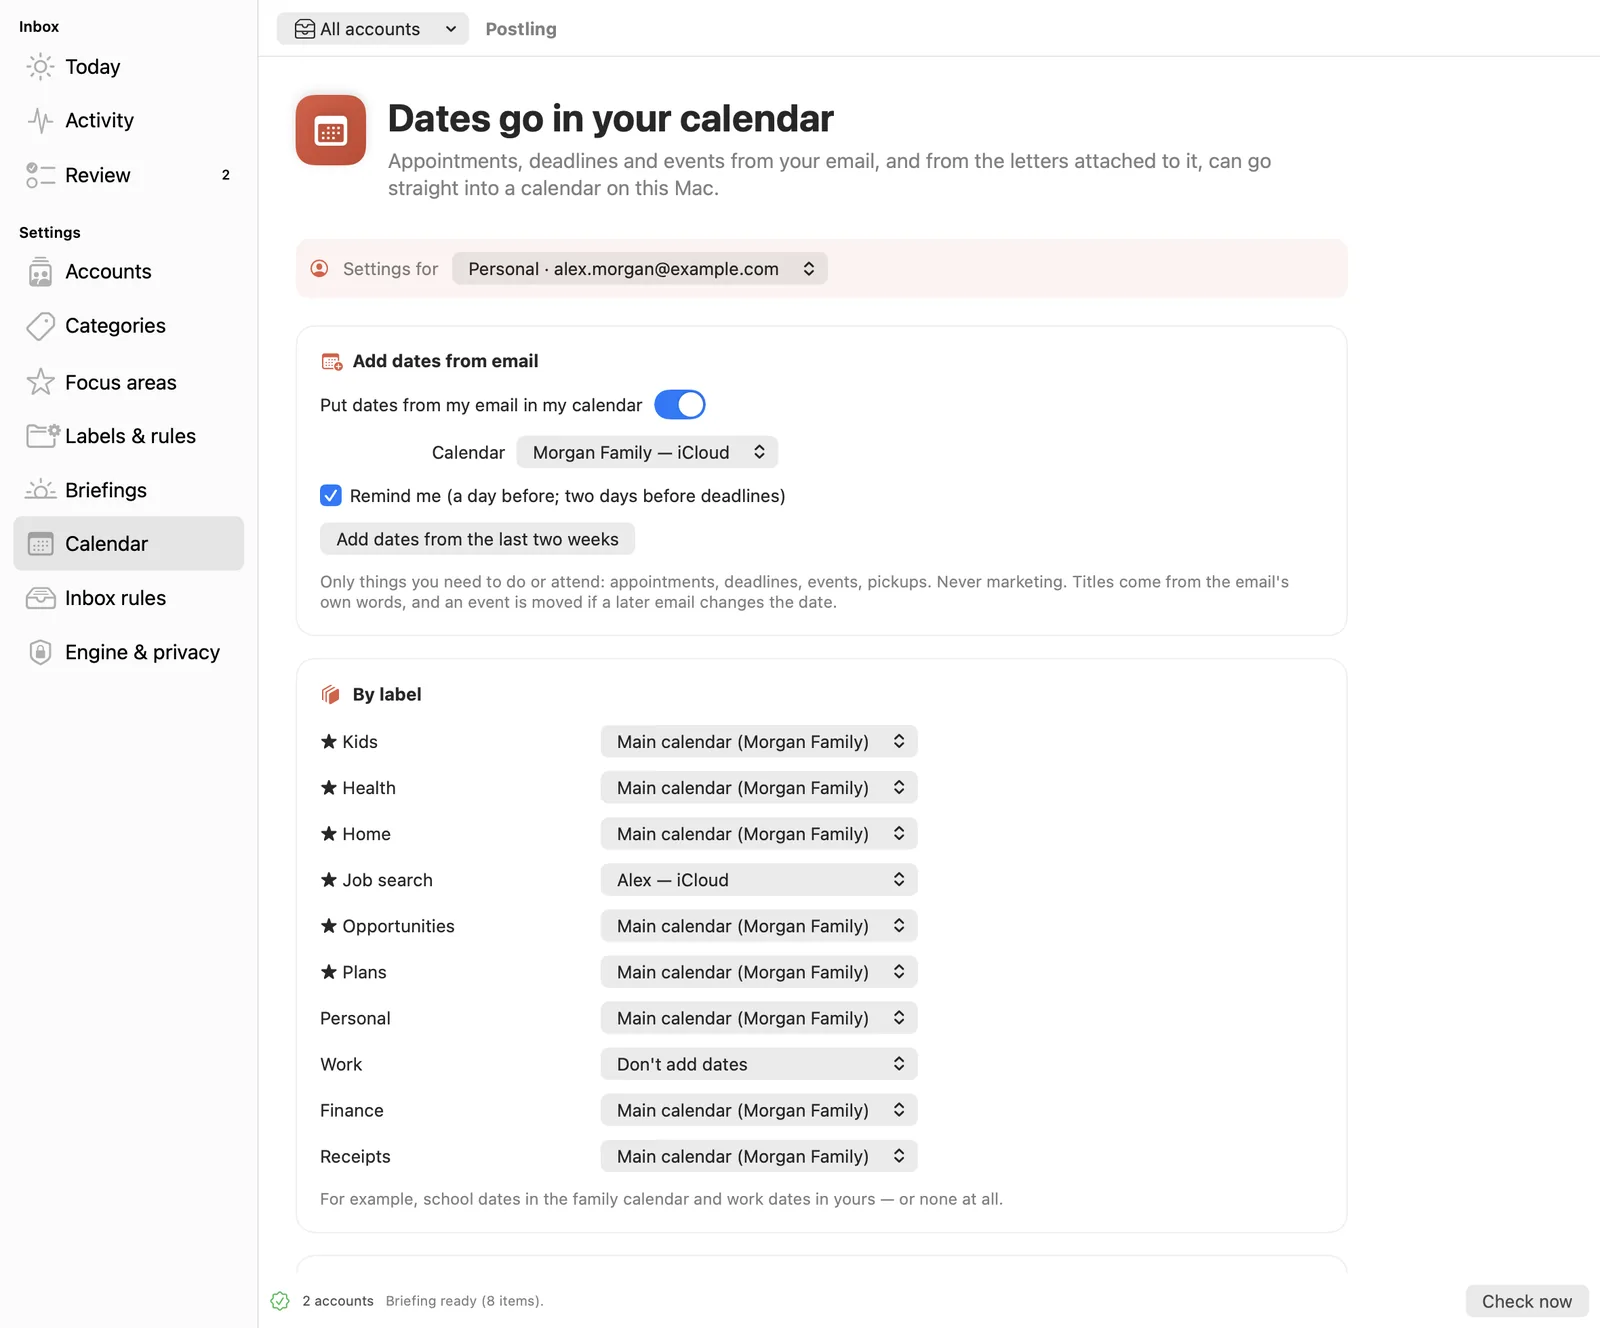
Turn on Put dates from my email in my calendar and choose a calendar. Any calendar on your Mac works, including iCloud, Google and Exchange. Postling adds only things you need to do or attend, never marketing dates. Titles come from the email's own words.
- By label: send each area to its own calendar, such as school dates to the family calendar, the job search to yours and nothing from work.
- Remind me adds an alert a day before, or two days before deadlines.
- Attachments and letters: Postling can read PDF letters and photos of letters attached to important emails, and open letters linked from school platforms like SchoolPost, so their dates reach your calendar too.
- If a later email changes a date, the event moves.
Step 10 of 12
Inbox rules
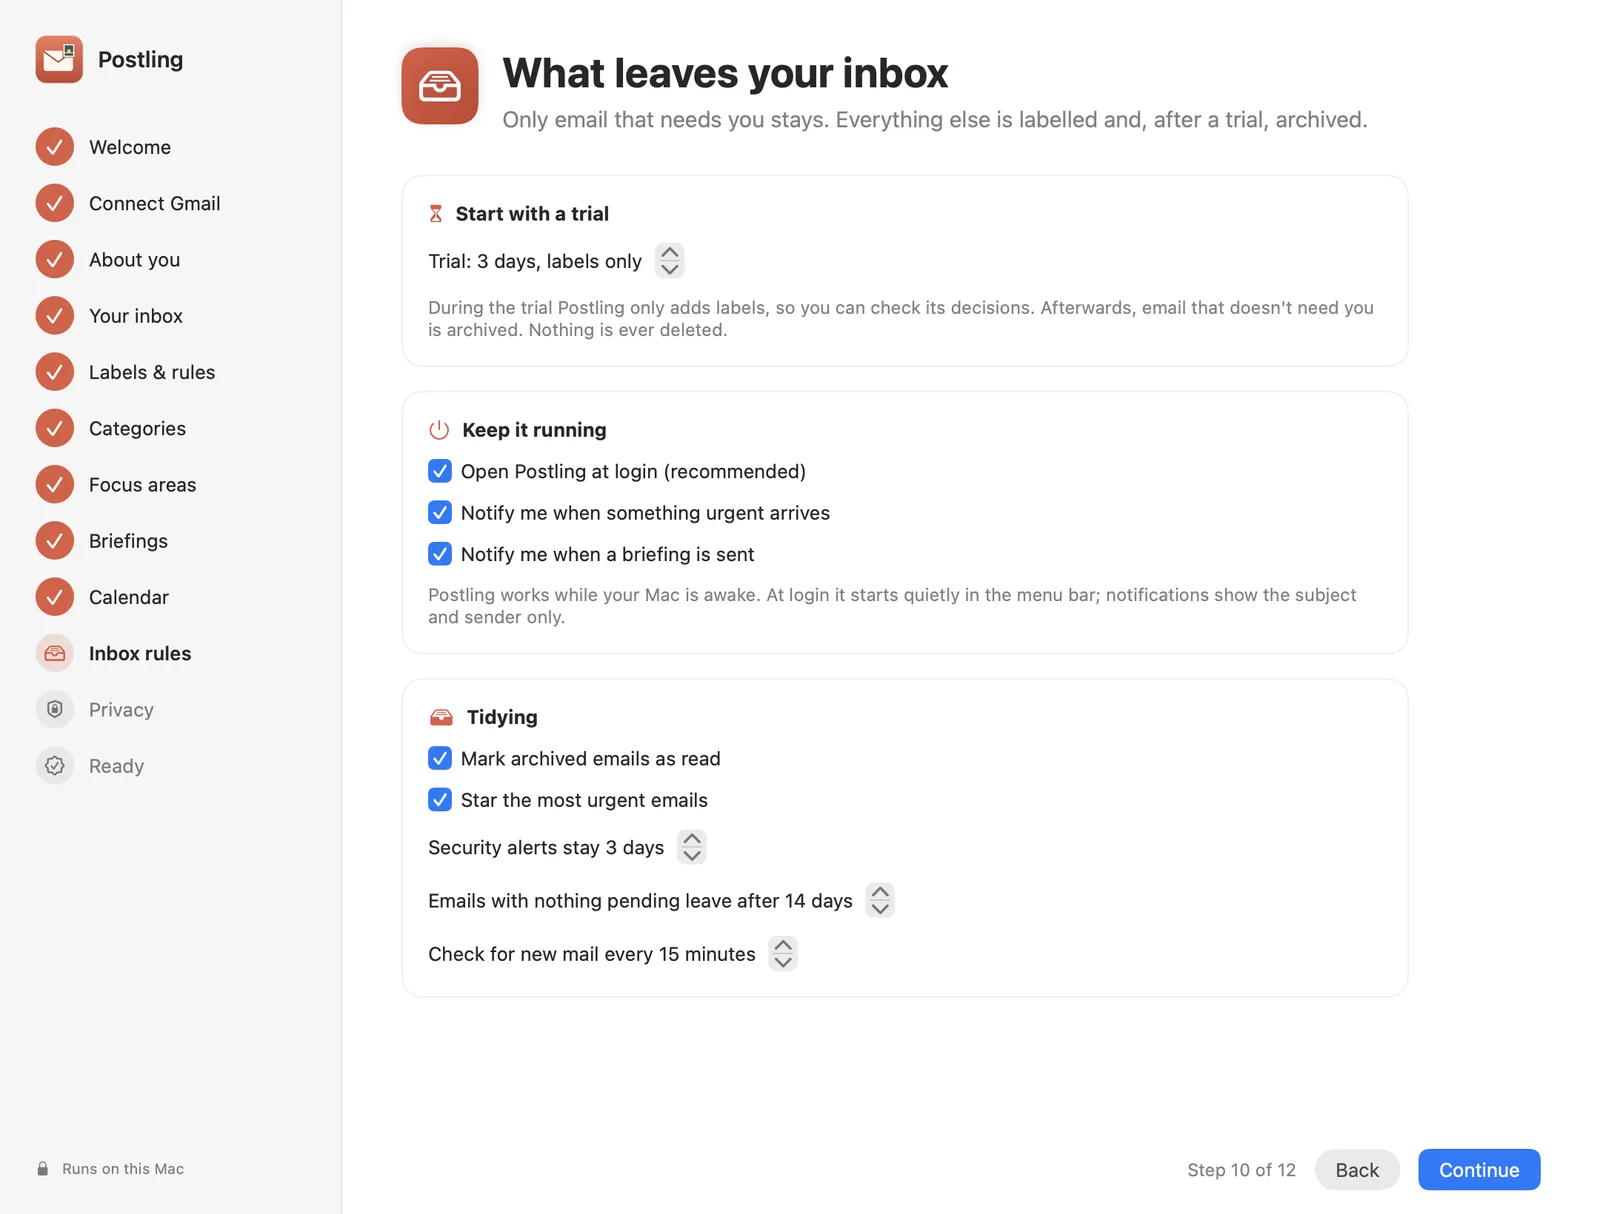
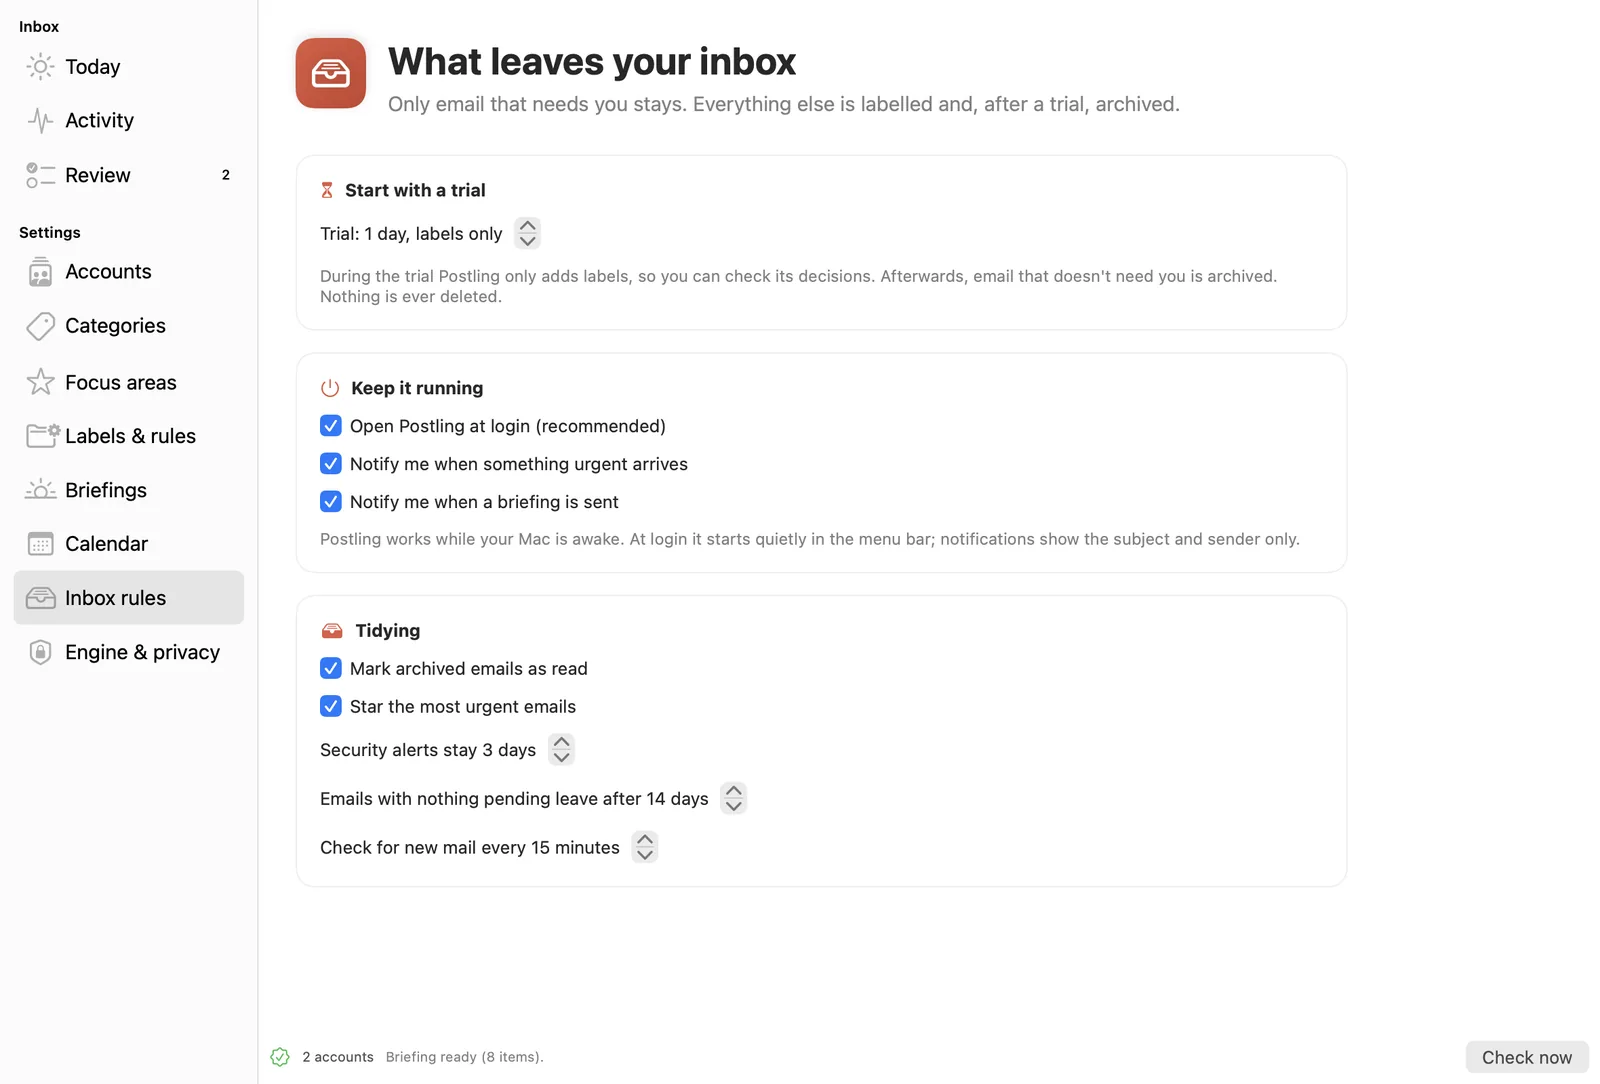
Only email that needs you stays in your inbox. Everything else is labelled and, after a trial, archived. Nothing is ever deleted.
- Trial: for the first few days (3 by default) Postling only adds labels, so you can check its decisions before anything leaves your inbox.
- Keep it running: open Postling at login (recommended), and get a notification when something urgent arrives or a briefing is sent.
- Tidying: mark archived emails as read, star the most urgent, clear security alerts after 3 days, and check for new mail every 15 minutes.
Step 11 of 12
Privacy
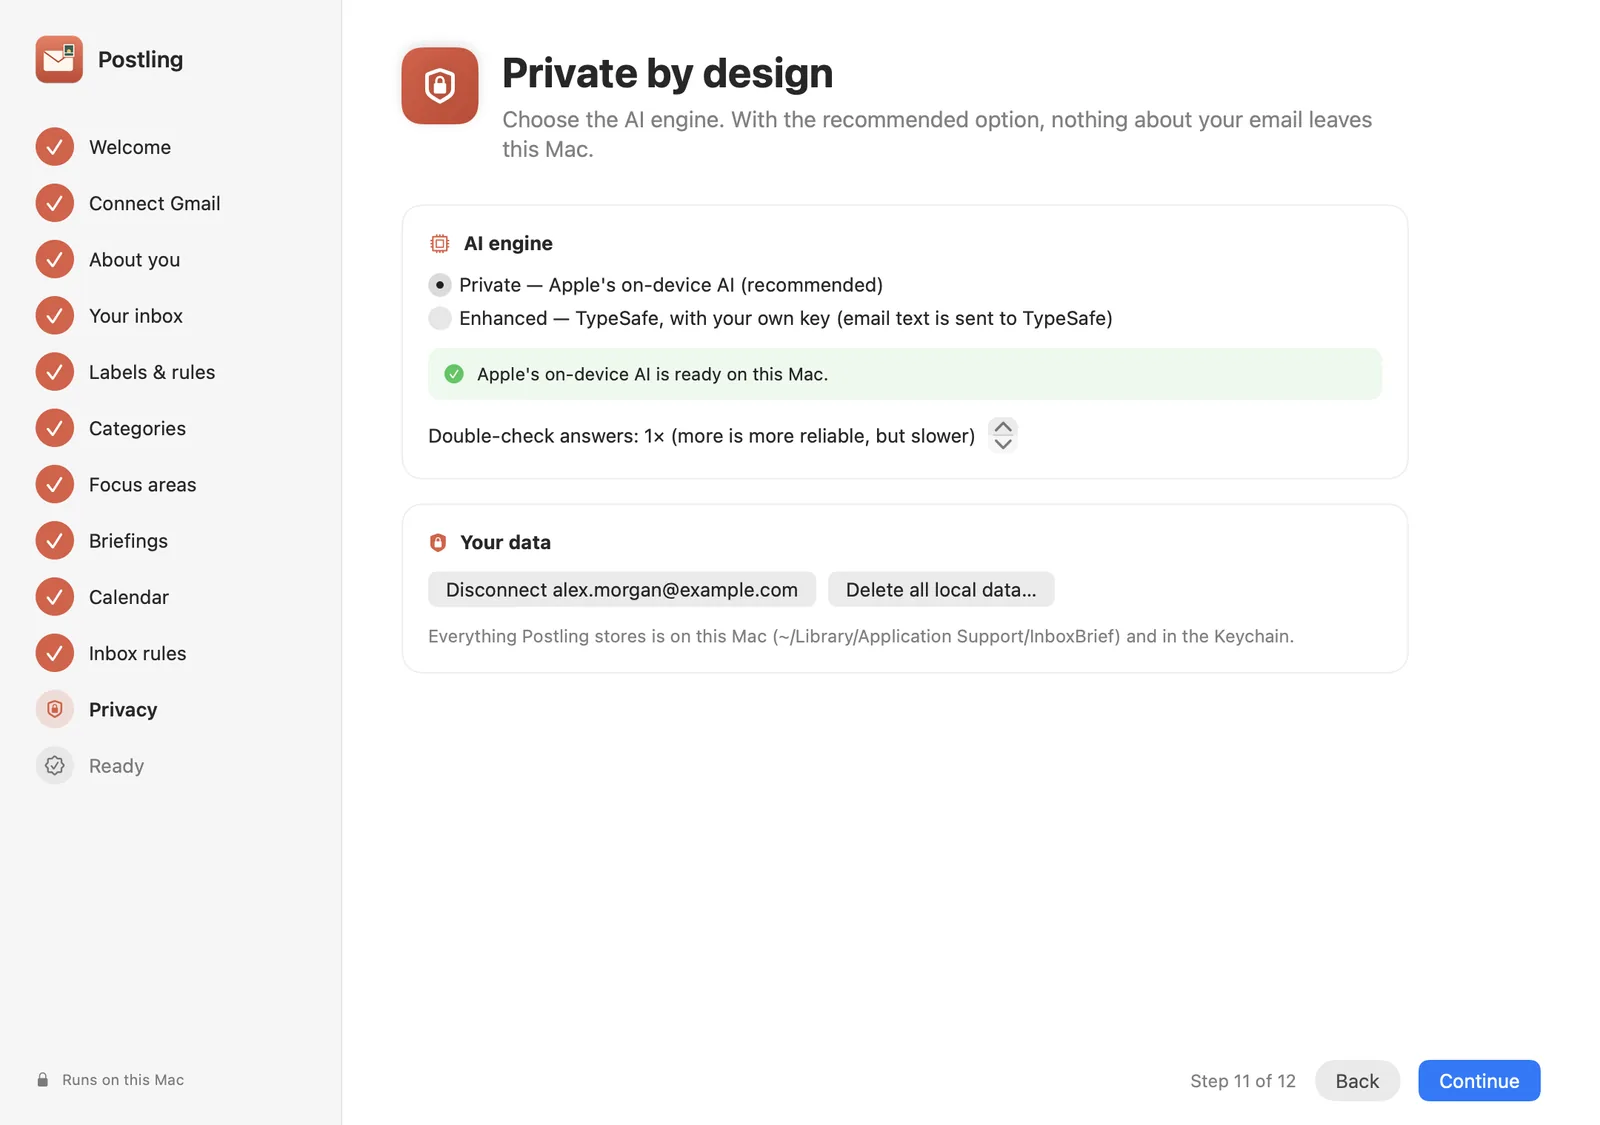
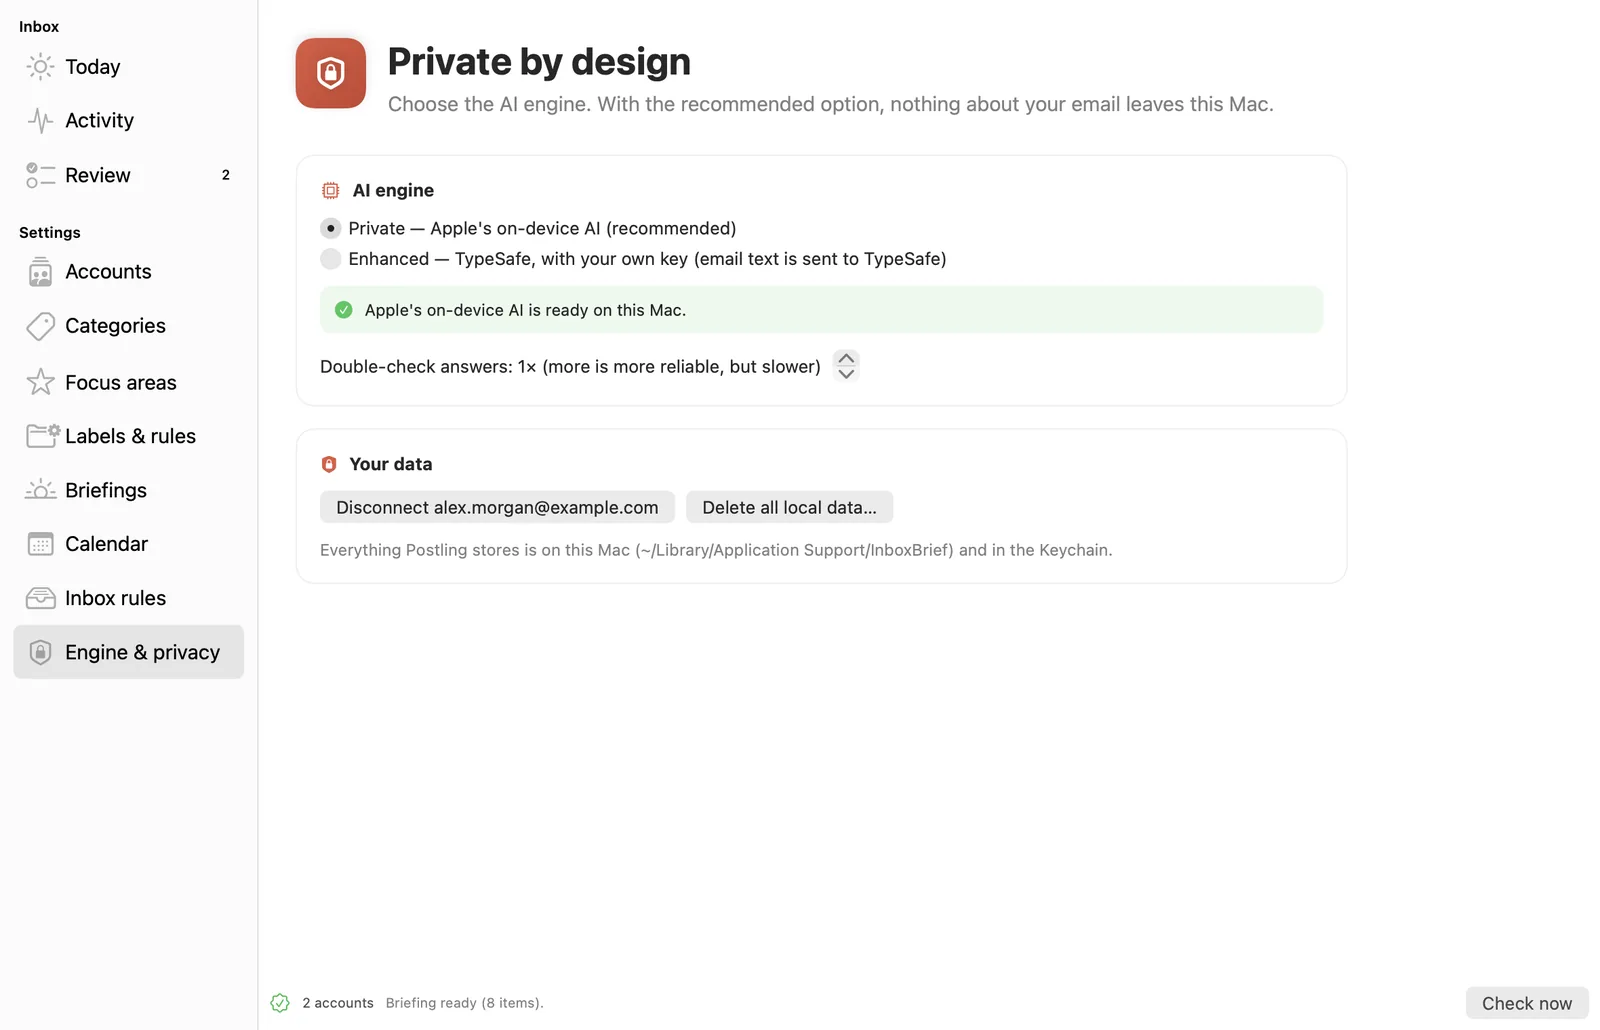
Choose the AI engine. The recommended option is Apple's on-device AI, so nothing about your email leaves your Mac. A green note confirms it's ready. If you prefer, you can use TypeSafe with your own key instead, in which case email text is sent to TypeSafe.
Your data shows where everything is stored. From here you can disconnect your account or delete all local data at any time.
Step 12 of 12
You're all set
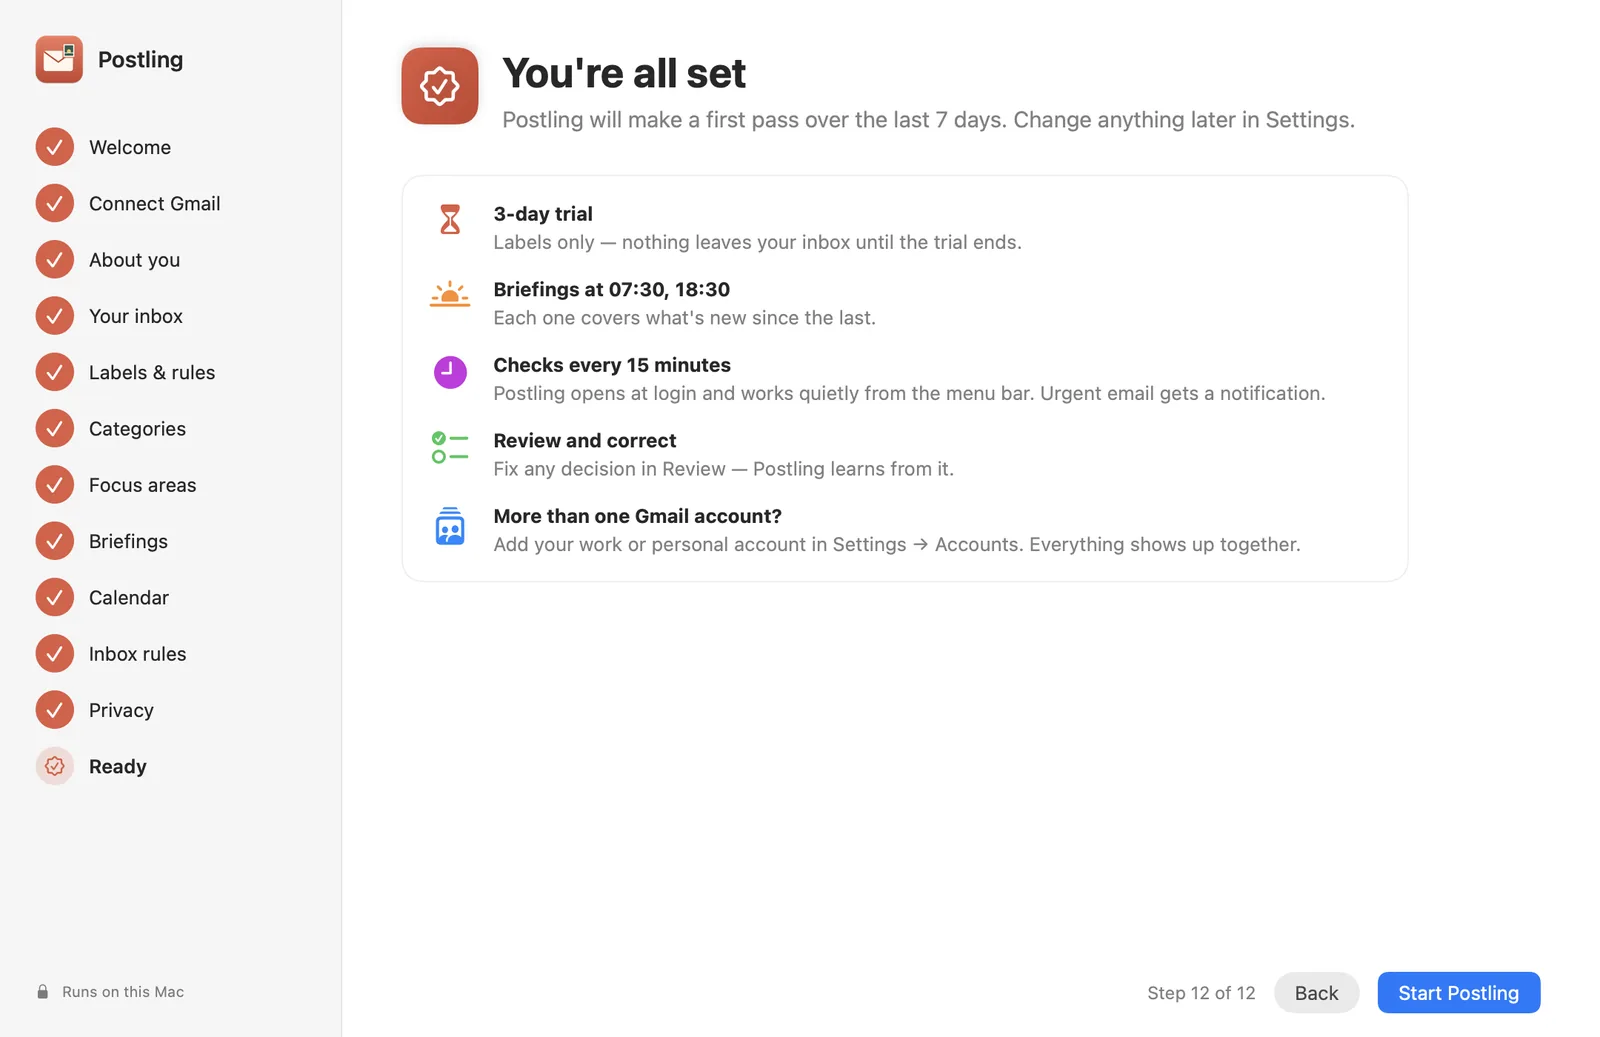
A summary of your choices: the trial, your briefing times and how often Postling checks your mail. Press Start Postling. It sorts your last 7 days of email, and your first briefing arrives at the next time you chose.
Every day
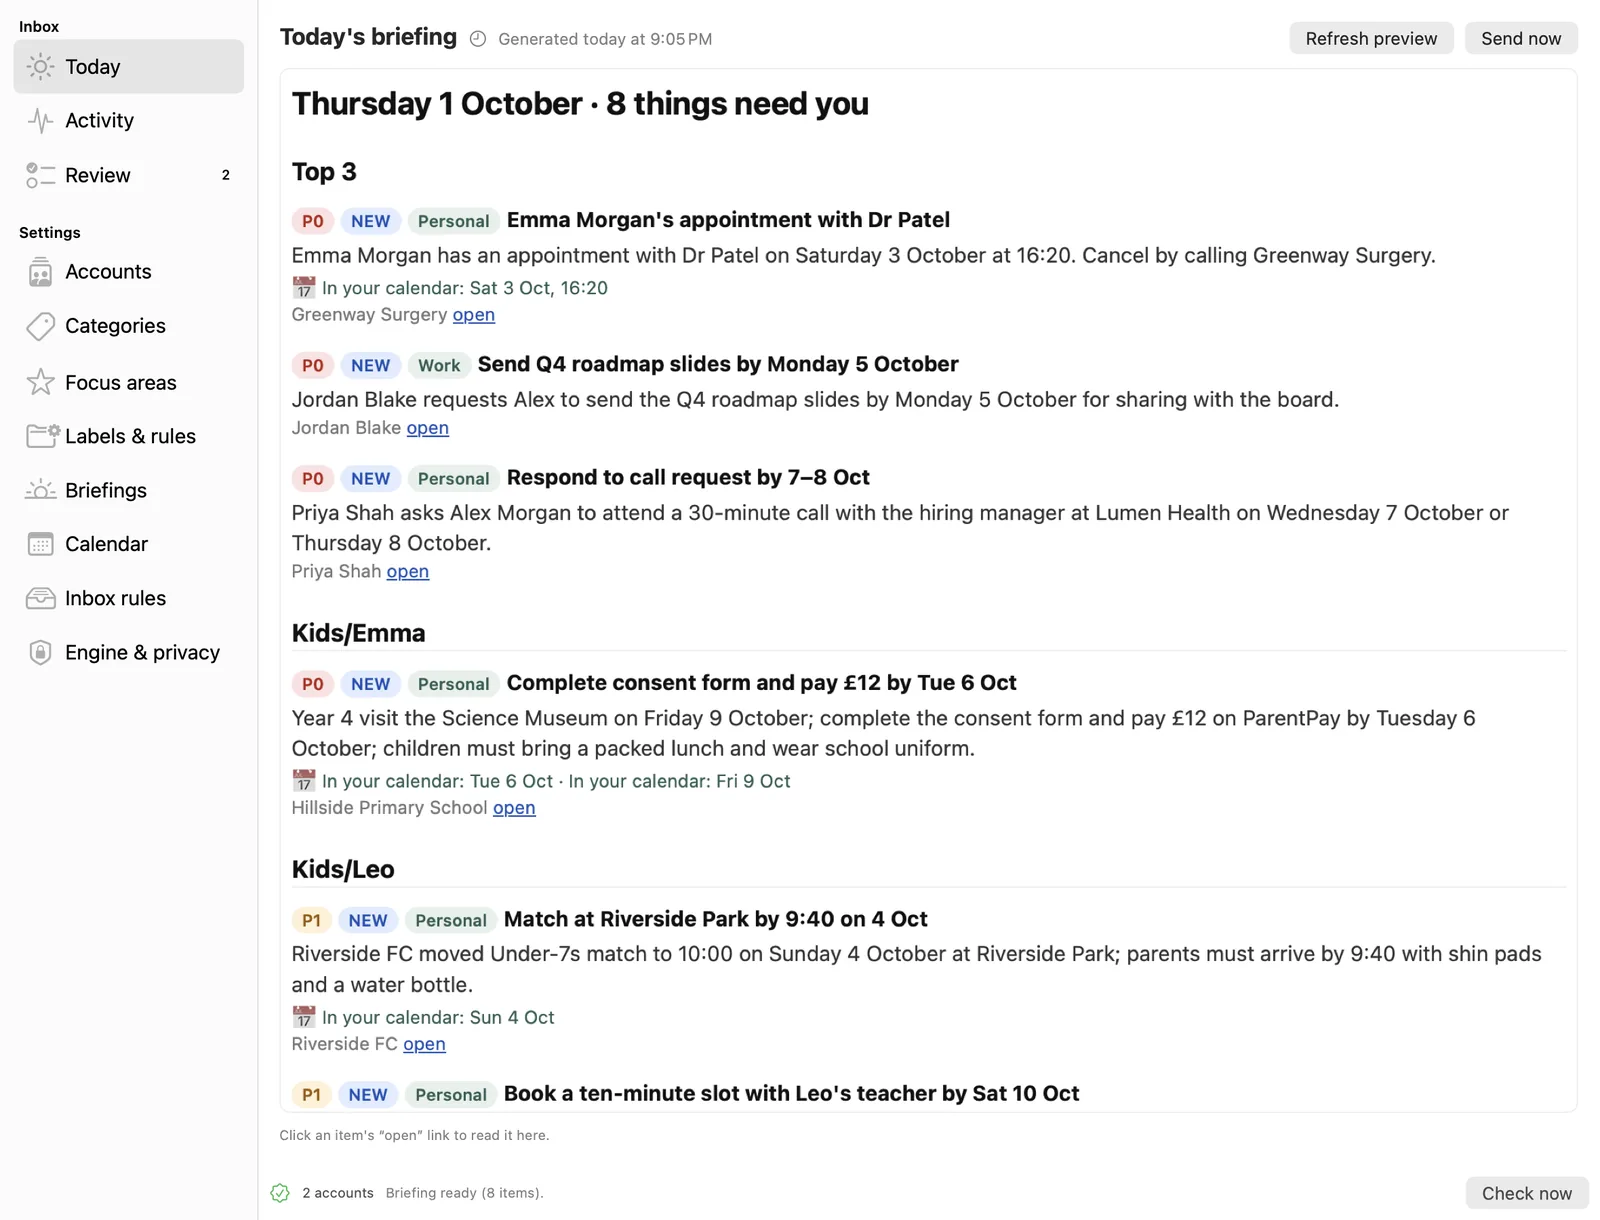
Today's briefing
Your briefing arrives by email at the times you chose. Today shows the latest one in the app, and Send now sends it straight away.
- Top 3 are the most important things right now. Below them, each focus area and person has a section, such as Kids/Emma and Kids/Leo.
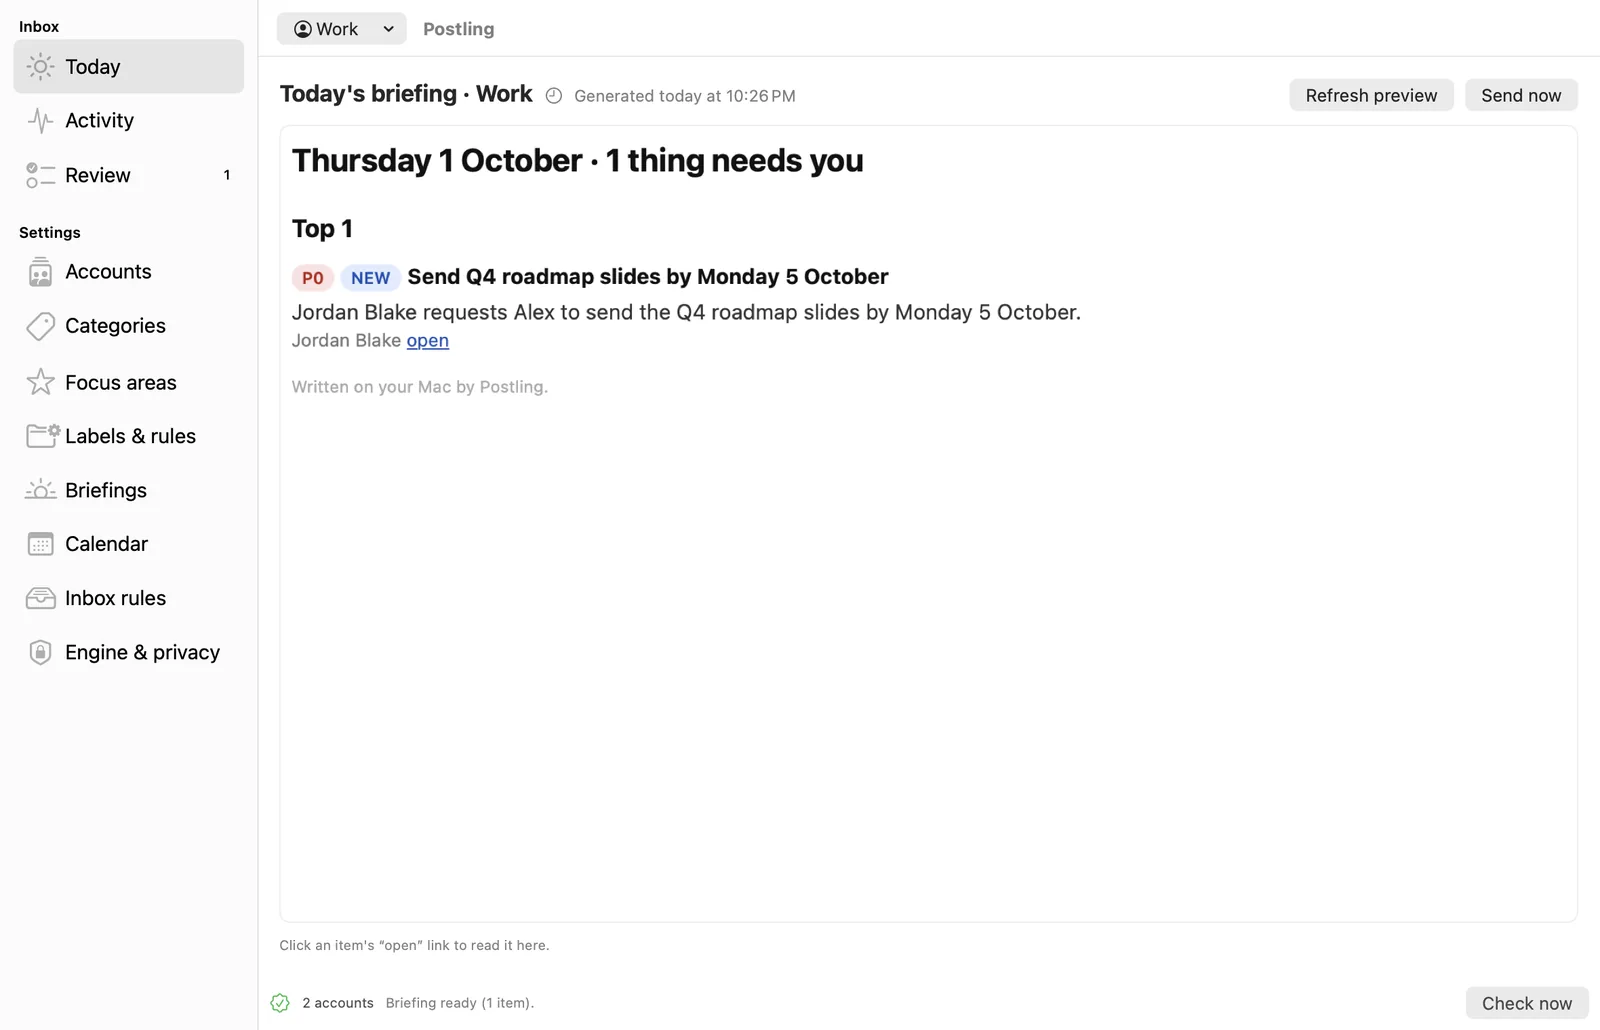
- P0 means it needs you today; P1 means soon. NEW, UPDATE and PENDING show what changed since the last briefing.
- With more than one account, a chip shows which account each item came from (here Personal or Work).
- 📅 In your calendar shows the dates Postling added. open shows the email in the app.
Review
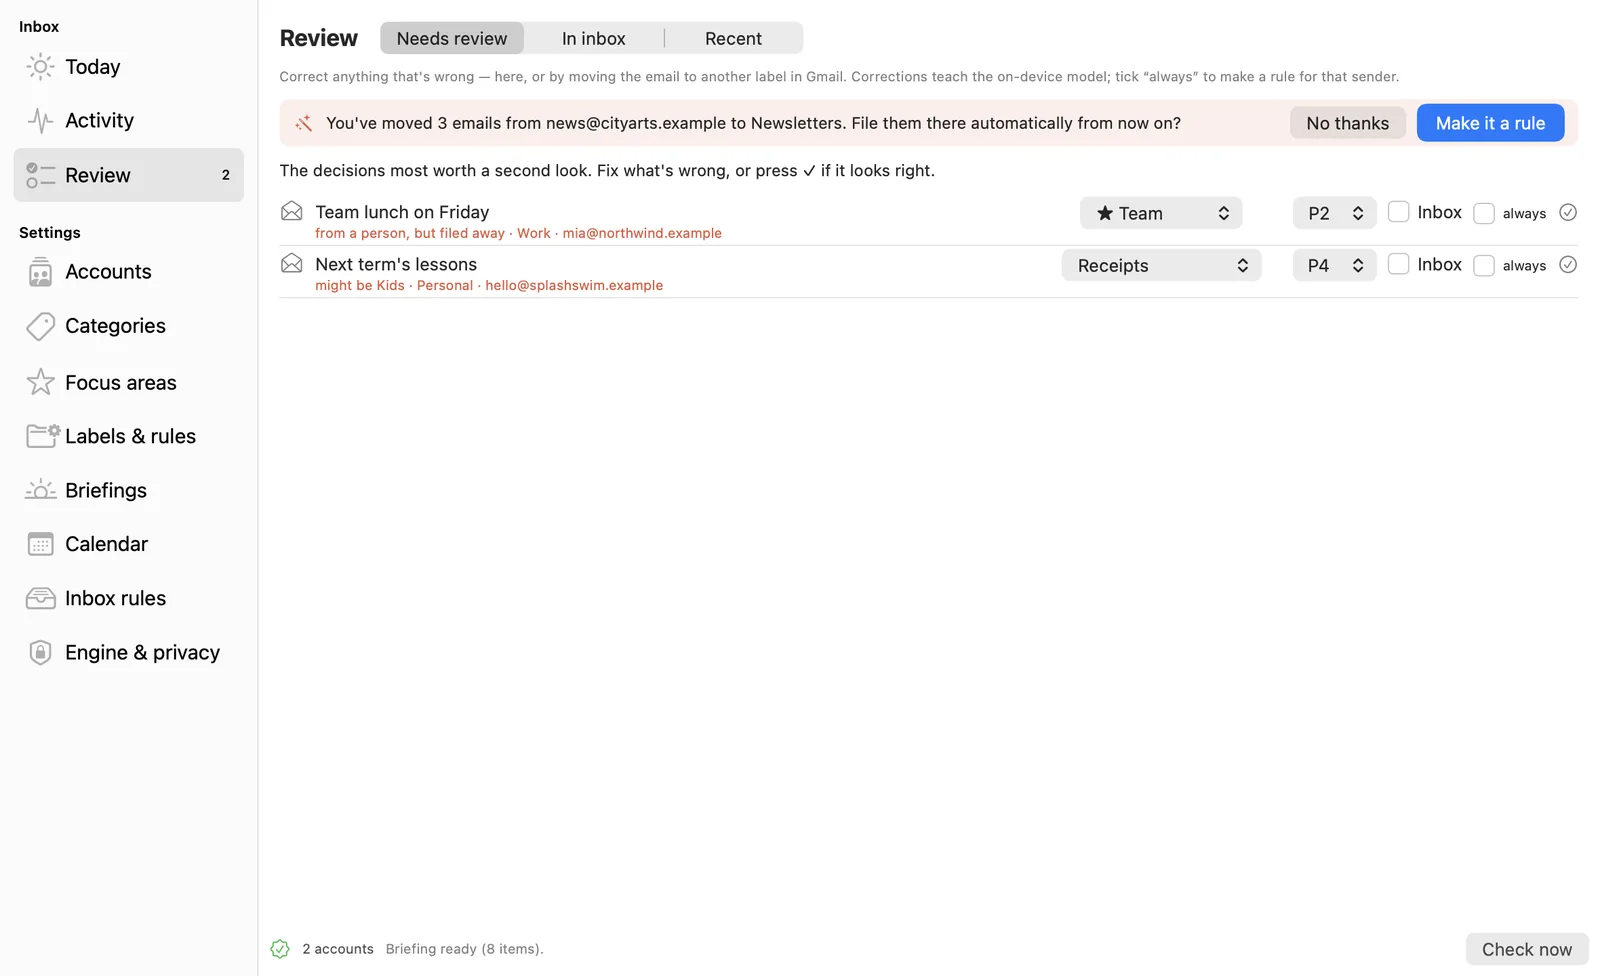
Needs review lists the few decisions worth a second look, each with the reason, such as "from a person, but filed away" or "might be Kids". For each one:
- Change the category, priority or Inbox if something's wrong.
- Tick always to make a rule for that sender.
- Press ✓ if it looks right.
You can also correct Postling from Gmail, on any device: move an email to another label, back to the inbox, or star it. Postling learns from that on its next check. After you've moved three emails from the same sender, it offers to make a rule.
Activity
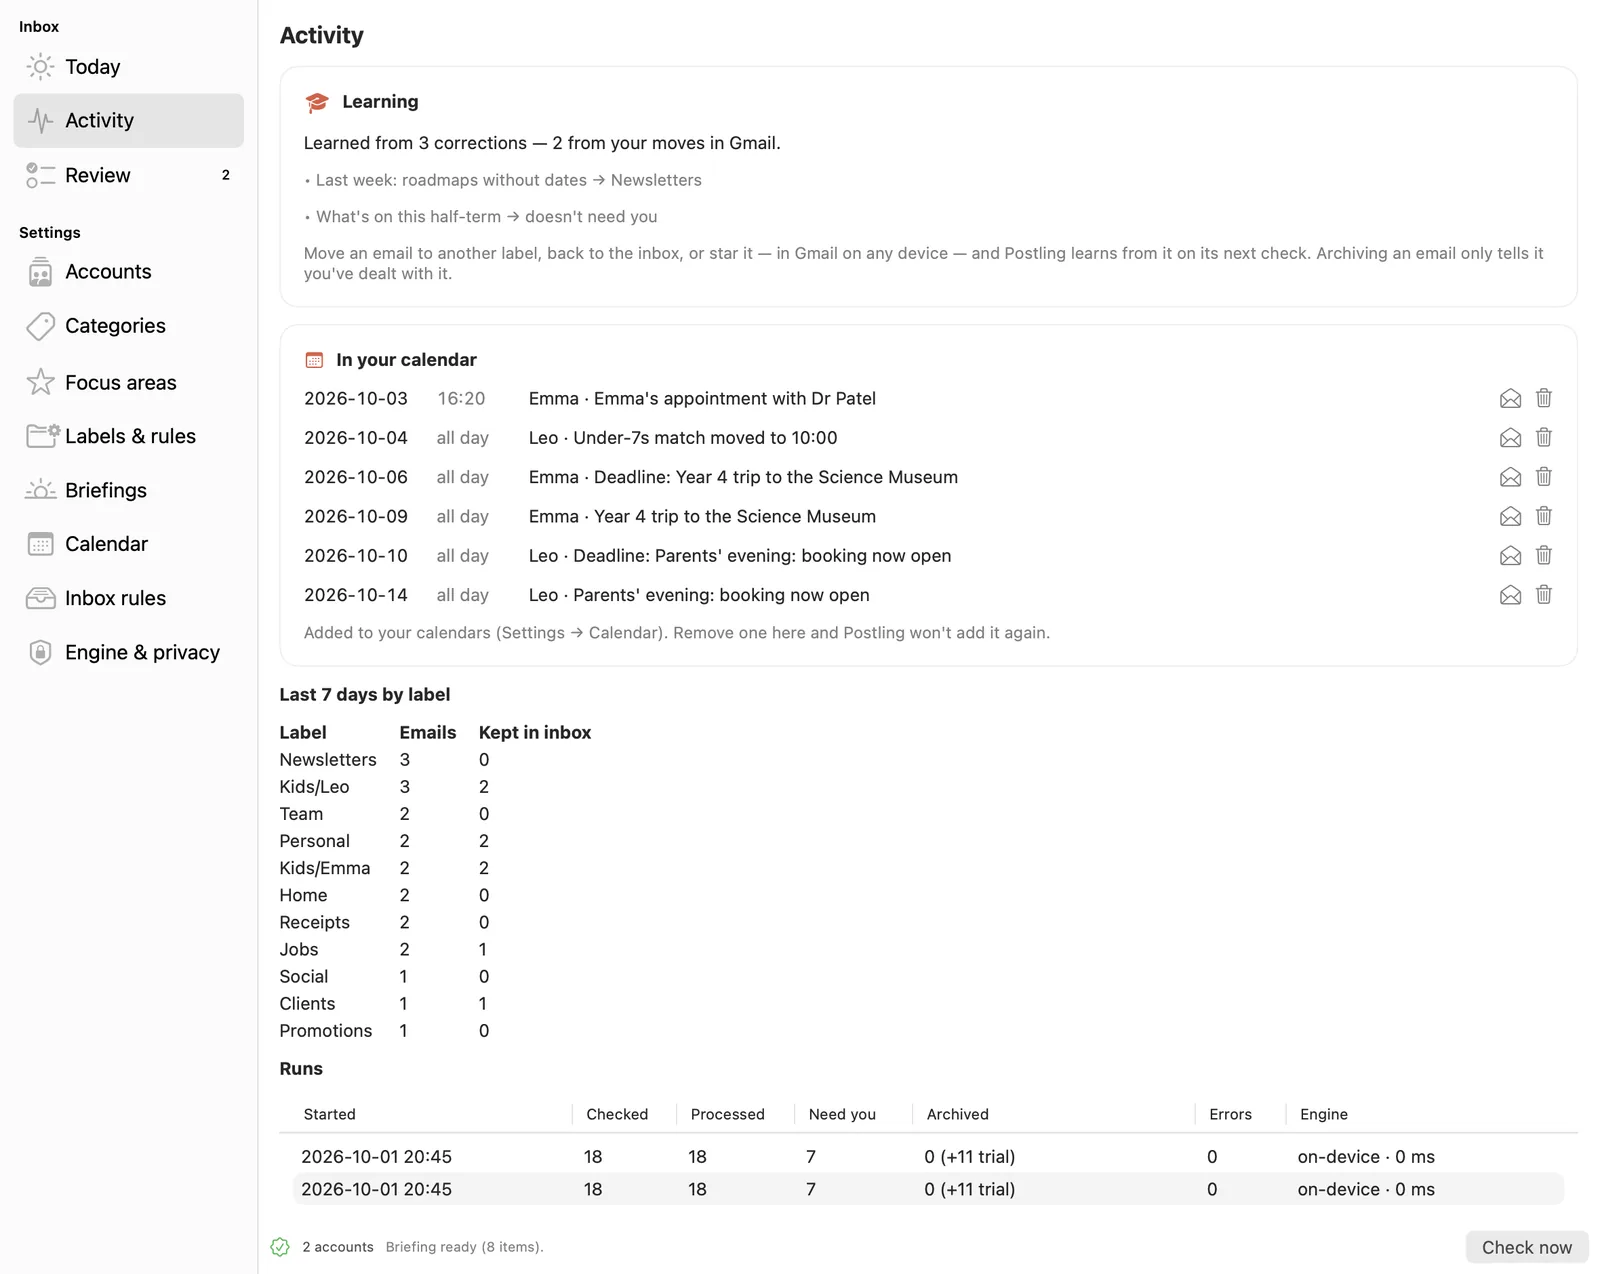
What Postling has been doing:
- Learning: the corrections it has learned from, including your moves in Gmail.
- In your calendar: every date it added, with a button to read the email and one to remove the event. A removed event is never added again.
- Last 7 days by label: how much arrived and how much was kept in your inbox.
- Runs: each check, with what was processed and archived.
More than one account
Connect a second Gmail account, such as work alongside personal, from Settings → Accounts → Add another Gmail account. Each account has its own settings: its own focus areas, categories, labels and rules, briefings and calendar. Everything is still in one place.
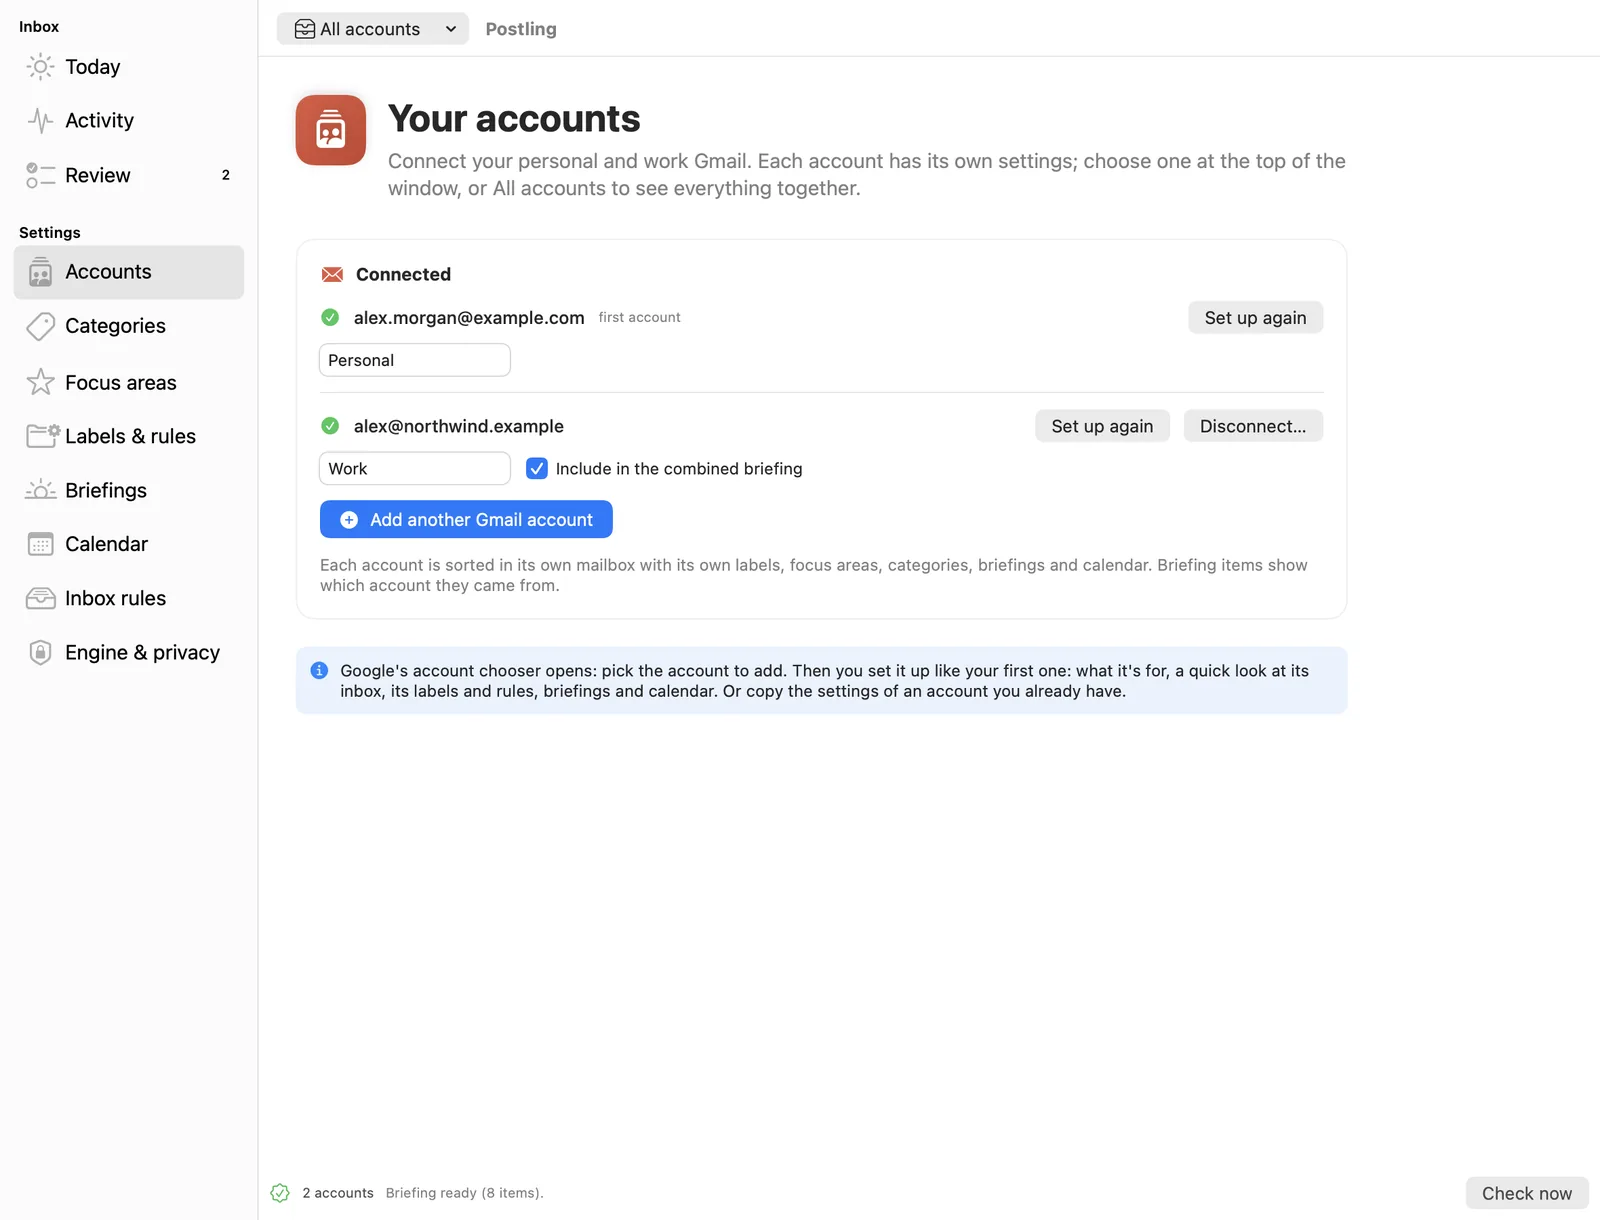
Setting up a new account. After Google's sign-in, Postling runs the same setup as for your first account: what the account is for, a quick look at its inbox, its own labels and rules, briefings and calendar. To save time, Copy settings from starts from an account you already have. The new account isn't sorted until you finish. If you stop part-way, Finish setup in Accounts takes you back.
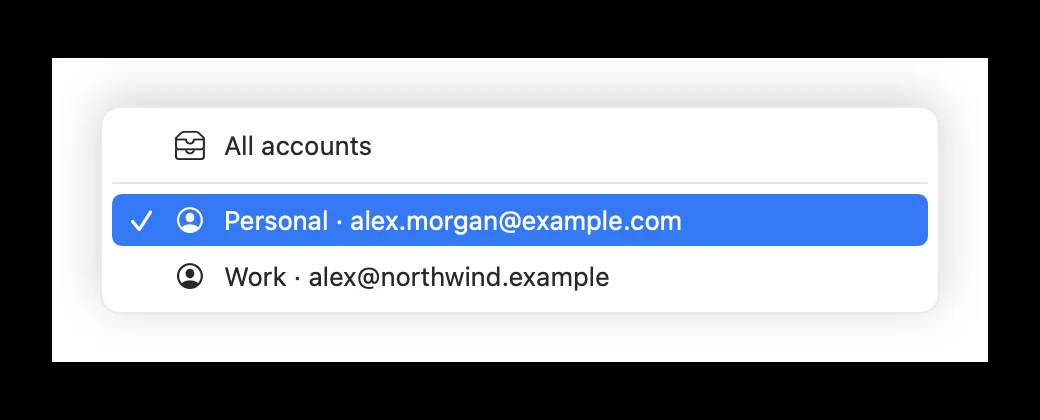
One account, or all together. The account menu at the top left of the window switches between All accounts and a single account. Today, Review and Activity show what you pick, and the menu shows which one you're looking at.
Here, Today shows only the work account.
Briefings for each account. Each account can send its own briefing, at its own times and to its own recipients. Any account can also be included in the combined briefing, which goes out with your first account's at its times, with a chip on each item showing which account it came from. Settings pages show Settings for at the top, so you always know which account you're changing.
Settings
Every setup step has its own page under Settings in the sidebar, so you can change anything at any time. With several accounts, choose whose settings you're changing at the top of the page.
Good to know
- Postling lives in the menu bar. Close the window and it keeps working. Use the menu to check mail or send a briefing now.
- Nothing is ever deleted. Postling labels, archives, marks as read and stars. Everything it archives is still in Gmail under its label.
- Correct it anywhere. Moving an email between labels in Gmail on your phone teaches Postling as well as Review does.
- It works while your Mac is awake. After sleep it catches up on its next check.
- Your email stays on your Mac. Read how Postling handles your data.